Job Search Engine
974 浏览 6 years, 2 months
2.5 集成Bootstrap + JQuery
版权声明: 转载请注明出处 http://www.codingsoho.com/集成Bootstrap + JQuery
到目前为止,我们看到的图都比较简单,没有任何样式的美化,这一节我们通过Bootstrap和JQuery进行简单的美化
打算采用的版本
bootstrap 3.3.7
Jquery 1.12.4
基本主页
我们先创建一个主页,内容的话不需要从头开始写,我从https://getbootstrap.com/docs/3.3/直接把源码拷贝下来,放到home.html文件里
添加文件jse.views.py,添加模板视图
from django.views.generic.base import TemplateView
from django.utils import timezone

class HomeView(TemplateView):
    def get_context_date(self, *args, **kwargs):
        context = super(HomeView, self).get_context_date(*args, **kwargs)
        context['now'] = timezone.now()
        return context
为该视图添加路由
from .views import HomeView
urlpatterns = [
    url(r'^$', HomeView.as_view(template_name='home.html'), name = 'home'),
]
这样, http://127.0.0.1:8000/就可以访问主页了,页面比较乱,需要整理一下,整理主要从几个方法着手
1.添加静态资源存储位置,用于存放图片,css和js文件等
STATIC_ROOT = os.path.join(os.path.dirname(BASE_DIR), "static_cdn")
MEDIA_ROOT = os.path.join(os.path.dirname(BASE_DIR), "media_cdn")

STATICFILES_DIRS = (
    os.path.join(BASE_DIR, "static"),
    os.path.join(os.path.dirname(BASE_DIR), "env27", "Lib", "site-packages", "django", "contrib", "admin", "static"),
)
2.修改css和js链接为cdn地址,或者存放到本地文件,改成相对路径, 用static标签完成
<link href=dist/css/bootstrap.min.css rel=stylesheet>
上面这个是原始内容,我们可以用cdn
https://cdn.bootcss.com/twitter-bootstrap/3.3.7/css/bootstrap.min.css
或者下载到本地,目前就是上面定义的STATIC_ROOT,然后用static标签完成路径
{% load staticfiles %}
<link href={% static 'css/bootstrap.min.css' %} rel=stylesheet>
生成简单的代码如下
{% load staticfiles %}

<!DOCTYPE html>
<html lang=en>

<head>
  <meta charset=utf-8>
  <meta content="IE=edge" http-equiv=X-UA-Compatible>
  <meta content="width=device-width,initial-scale=1" name=viewport>
  <meta content="JSE, Job Search Enginee" name=description>
  <meta content="Justin" name=author>
  <title> JSE, Job Search Enginee. </title>
  <link href='[https://cdn.bootcss.com/twitter-bootstrap/3.3.7/css/bootstrap.min.css](https://cdn.bootcss.com/twitter-bootstrap/3.3.7/css/bootstrap.min.css)' rel=stylesheet>
  <link href="{% static 'images/apple-touch-icon.png' %}" rel=apple-touch-icon>
  <link href="{% static 'images/favicon.ico' %}" rel=icon>
</head>

<body class=bs-docs-home>
  <header class="navbar navbar-static-top" id=top>
    <div class=container>
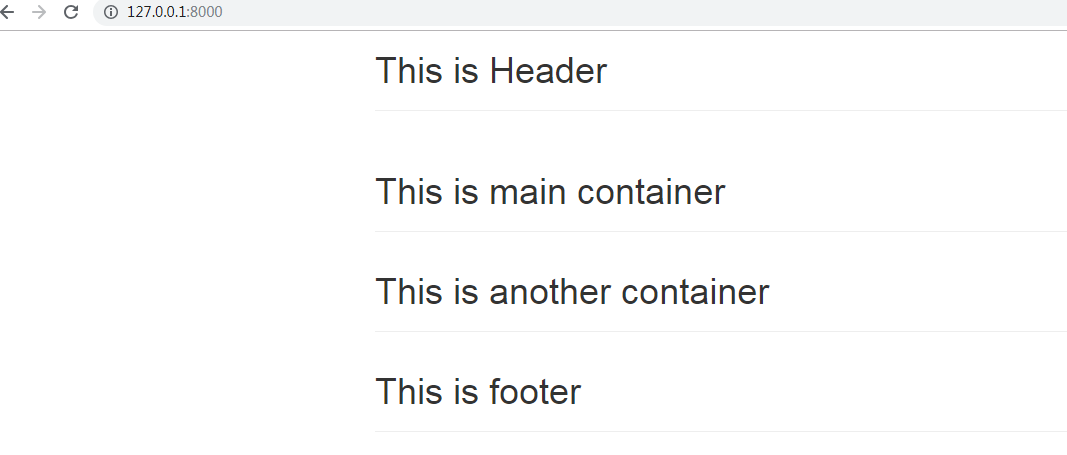
      <h1>This is Header</h1>
      <hr>
    </div>
  </header>
  <main class="" id="content" tabindex=-1>
    <div class=container>
      <h1>This is main container</h1>
      <hr>
    </div>
  </main>

  <div class="">
    <div class=container>
      <h1>This is another container</h1>
      <hr>
  </div>
  <footer class="">
    <div class=container>
      <h1>This is footer</h1>
      <hr>
    </div>
  </footer>

  <script src='[https://cdn.bootcss.com/jquery/1.12.4/jquery.min.js](https://cdn.bootcss.com/jquery/1.12.4/jquery.min.js)'></script>
  <script>
    window.jQuery || document.write('<script src="{% static 'js/jquery.min.js' %}"><\/script>')
  </script>
  <script src='[https://cdn.bootcss.com/twitter-bootstrap/3.3.7/js/bootstrap.min.js](https://cdn.bootcss.com/twitter-bootstrap/3.3.7/js/bootstrap.min.js)'></script>
这段框架代码包含了head和body,在body里又包含了header, main, div, foot等组成部分,在html的开始和结束部分分别添加了css和js信息
效果如下
 ,
,
非常的简单,我们接下来添加navbar和jumbotron
添加组件
添加navbar
进入bootstrap的component https://getbootstrap.com/docs/3.3/components/#navbar
将示例代码拷贝到navbar.html,然后修改home.html
  <header id="top">
    {% include "navbar.html" %}
  </header>
添加超大屏幕
组件链接 https://getbootstrap.com/docs/3.3/components/#jumbotron
代码如下
  <div class="jumbotron">
    <div class="container">
      <h1>Hello, world!</h1>
      <p>...</p>
      <p><a class="btn btn-primary btn-lg" href="#" role="button">Learn more</a></p>
    </div>
  </div>
使用 extends和include标签
上面navbar我们就使用了include标签,将一个独立的模板文件直接包含到当前模板中
此处之外,我们还要使用extends标签,它会实现继承的功能
例如,对于本应用,我们在home.html写好的代码,并不需要在其他的文件重新写一遍,我们可以提取出共性部分,然后在各个具体的模板里改写不同的部分,这个跟C++,python等的类继承原理是一致的
创建base.html,这个是所有模板的基础,然后在home.html用{% extends "base.html" %}继承
完成的代码如下
base.html
{% load staticfiles %}

<!DOCTYPE html>
<html lang=en>

<head>
  <meta charset=utf-8>
  <meta content="IE=edge" http-equiv=X-UA-Compatible>
  <meta content="width=device-width,initial-scale=1" name=viewport>
  <meta content="JSE, Job Search Enginee" name=description>
  <meta content="Justin" name=author>
  <title> JSE, Job Search Enginee. </title>
  {% block head_css %}
  {% include "head_css.html" %}
  {% endblock %}
</head>

<body>
  {% block header %}
  <header id="top">
    {% include "navbar.html" %}
  </header>
  {% endblock %}

  {% block jumbotron %}
  <div class="jumbotron">
    <div class="container">
      <h1>Hello, world!</h1>
      <p>...</p>
      <p><a class="btn btn-primary btn-lg" href="#" role="button">Learn more</a></p>
    </div>
  </div>
  {% endblock %}

  <main class="" id="content" tabindex=-1>
    <div class=container>
      {% block content %}
      {% endblock %}
    </div>
  </main>

  <footer class="">
    <div class="container-fluid">
      {% block footer %}
      <div class="row">
        <div class="col-sm-3 col-sm-offset-3">
          <h1>This is footer</h1>
        </div>
      </div>
      {% endblock %}
    </div>
  </footer>

  <script>
  $(document).ready(function()
    { {% block jquery %}
    {% endblock %} });
  </script>

  {% include "javascript.html" %}
{% block %}{% endblock %}用于定义代码块,子模板可以改写它
{% include "javascript.html" %}包含其他文件
主页文件里就很简单,首先extends base.html,然后改写content这个block,添加需要的内容
home.html
{% extends "base.html" %}
{% load staticfiles %}
{% block content %}
<table class="table table-bordered">
  <caption>边框表格布局</caption>
  <thead>
    <tr>
      <th>名称</th>
      <th>城市</th>
      <th>邮编</th>
    </tr>
  </thead>
  <tbody>
    <tr>
      <td>Tanmay</td>
      <td>Bangalore</td>
      <td>560001</td>
    </tr>
    <tr>
      <td>Sachin</td>
      <td>Mumbai</td>
      <td>400003</td>
    </tr>
    <tr>
      <td>Uma</td>
      <td>Pune</td>
      <td>411027</td>
    </tr>
  </tbody>
</table>
{% endblock %}
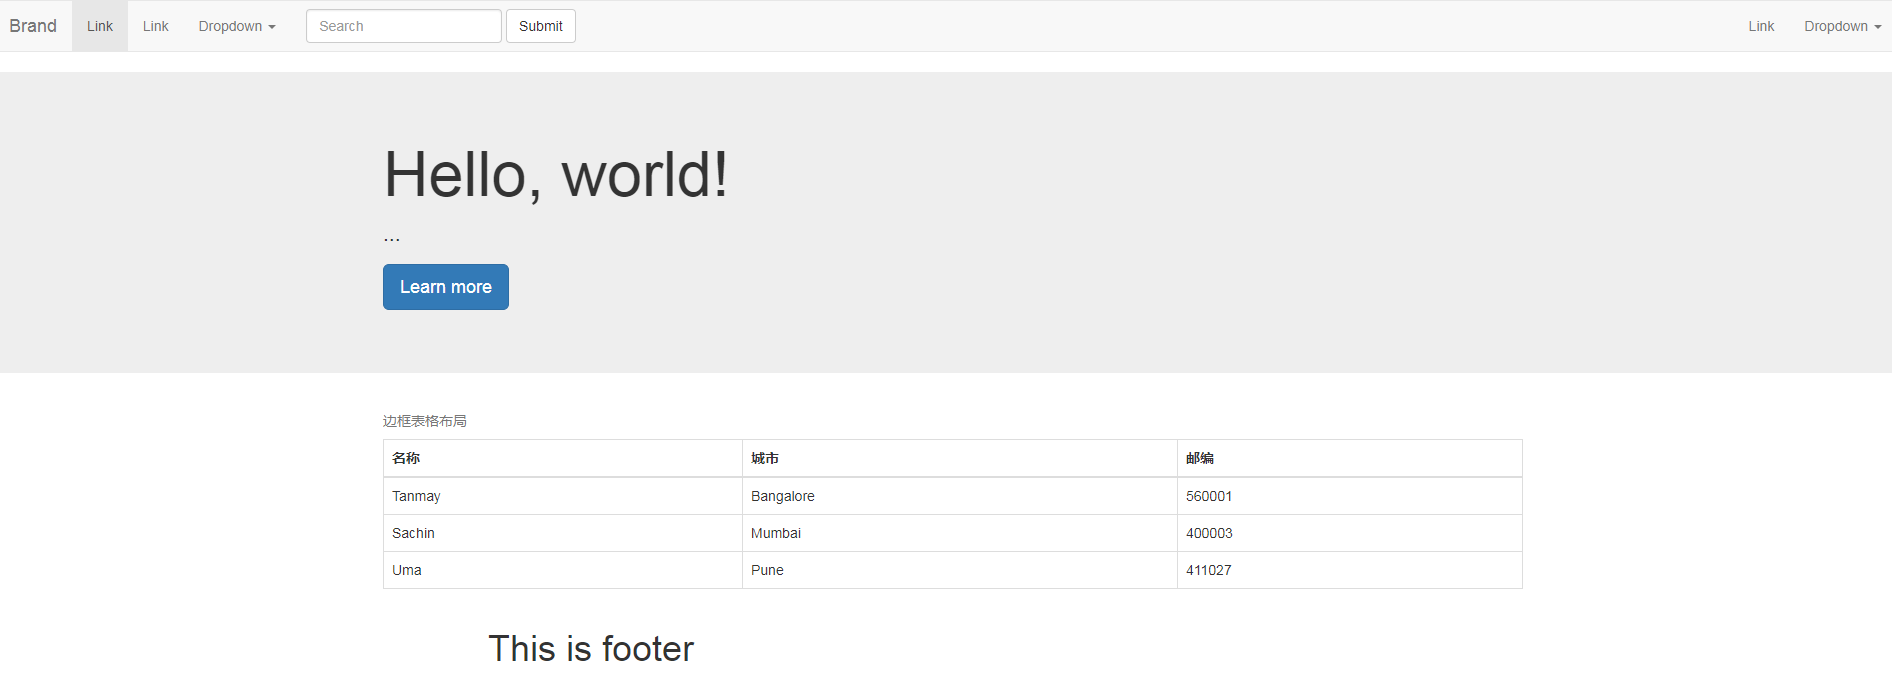
至此,一个简答的视图完成了,效果如下

这边只是搭了架子,具体的功能后面慢慢实现