
Apache 安装
前言
新版apache 2.4.3直接configure会报错,缺了两个模块apr和pcre,这是需要单独下载和编译的。
httpd 2.4
安装文档:http://httpd.apache.org/docs/2.4/install.html
APR and APR-Util
Apache Portable Runtime (APR),apache 可移植运行。
地址:http://apr.apache.org/
最新版包括3个组件:
APR 1.4.6, released Feb 14, 2012
APR-util 1.5.1, released October 5, 2012
APR-iconv 1.2.1, released November 26, 2007
这是原文说明:
Make sure you have APR and APR-Util already installed on your system. If you don’t, or prefer to not use the system-provided versions, download the latest versions of both APR and APR-Util from Apache APR(http://apr.apache.org/), unpack them into ./srclib/apr and ./srclib/apr-util (be sure the domain names do not have version numbers; for example, the APR distribution must be under ./srclib/apr/) and use ./configure’s –with-included-apr option. On some platforms, you may have to install the corresponding -dev packages to allow httpd to build against your installed copy of APR and APR-Util.
PCRE
Perl-Compatible Regular Expressions Library (PCRE),Perl兼容正则表达式库,新版httpd不再随包发布,需要到 http://www.pcre.org 下载,也可以装现成版本。如果安装后找不到,用–with-pcre指定pcre路径。可能需要安装相应的dev版本。
可以从ftp://ftp.csx.cam.ac.uk/pub/software/programming/pcre/或https://sourceforge.net/projects/pcre/files/pcre/下载源码。
离线下载
APR和APR-UTIL的下载地址:http://apr.apache.org/download.cgi
prce下载地址:http://ftp.exim.llorien.org/pcre/
在线下载
wget http://mirrors.tuna.tsinghua.edu.cn/apache/httpd/httpd-2.4.3.tar.gz
wget http://labs.mop.com/apache-mirror//apr/apr-1.4.6.tar.gz
wget http://labs.mop.com/apache-mirror//apr/apr-iconv-1.2.1.tar.gz
wget http://labs.mop.com/apache-mirror//apr/apr-util-1.5.1.tar.gz
ln -s apr-1.4.6 apr
ln -s apr-iconv-1.2.1 apr-iconv
ln -s apr-util-1.5.1 apr-util
wget ftp://ftp.csx.cam.ac.uk/pub/software/programming/pcre/pcre-8.31.tar.gz
编译安装
apr
# tar -zxf apr-1.4.6.tar.gz
# cd apr-1.4.6
# ./configure --prefix=/usr/local/apr
# make
# make install
apr-util
# tar -zxf apr-util-1.4.1.tar.gz
# cd apr-util-1.4.1
# ./configure --prefix=/usr/local/apr-util --with-apr=/usr/local/apr/bin/apr-1-config
# make
# make install
prce
# unzip -o pcre-8.30.zip
# cd pcre-8.30
# ./configure --prefix=/usr/local/pcre
# make
# make install
httpd
# tar jxvf httpd-2.4.1.tar.bz2
# cd httpd-2.4.1
# ./configure --prefix=/usr/local/apache2 --with-apr=/usr/local/apr --with-apr-util=/usr/local/apr-util/ --with-pcre=/usr/local/pcre
# make
# make install
启动apache
启动和停止
# cd /usr/local/apache2/bin
# apachectl -k stop
# apachectl –k start
如果启动失败,查看80端口是否被占用
# netstat -an | grep :80
如果被占用,可以在文件http.conf修改http端口
Listen 8800
# apachectl –k restart
查看apache 启动服务是否启动
# ps -aux | grep httpd
Warning: bad syntax, perhaps a bogus '-'? See /usr/share/doc/procps-3.2.7/FAQ
root 2866 0.0 1.2 25164 9556 ? Ss 22:45 0:00 /usr/sbin/httpd -k start
apache 2867 0.0 0.7 25300 5556 ? S 22:45 0:00 /usr/sbin/httpd -k start
apache 2868 0.0 0.6 25300 5444 ? S 22:45 0:00 /usr/sbin/httpd -k start
apache 2869 0.0 0.6 25300 5444 ? S 22:45 0:00 /usr/sbin/httpd -k start
apache 2870 0.0 0.7 25300 5556 ? S 22:45 0:00 /usr/sbin/httpd -k start
apache 2871 0.0 0.6 25164 4796 ? S 22:45 0:00 /usr/sbin/httpd -k start
apache 2872 0.0 0.6 25164 4796 ? S 22:45 0:00 /usr/sbin/httpd -k start
apache 2873 0.0 0.6 25164 4796 ? S 22:45 0:00 /usr/sbin/httpd -k start
apache 2874 0.0 0.6 25164 4796 ? S 22:45 0:00 /usr/sbin/httpd -k start
root 3141 0.0 0.0 4244 676 pts/1 R+ 22:48 0:00 grep httpd
下面访问一下apache默认页是否能打开。http://ip:80/index.html
查看apache版本
httpd –v
[root@localhost ~]# httpd -v
Server version: Apache/2.2.3
Server built: Nov 12 2008 07:09:27
如果外网不能访问
在终端输入setup,在Firmware Configuration=>选High(空格)=>Customize=>选eth0,www(http)=>OK! 顺便在System Service里面把httpd选上,就OK
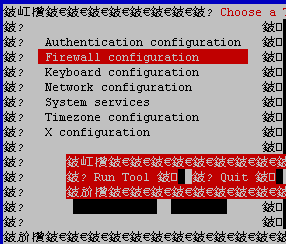
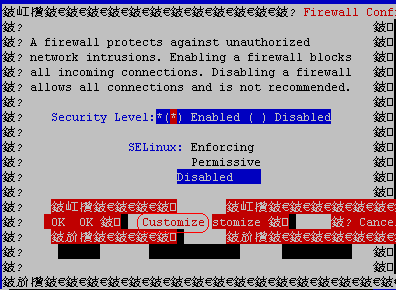
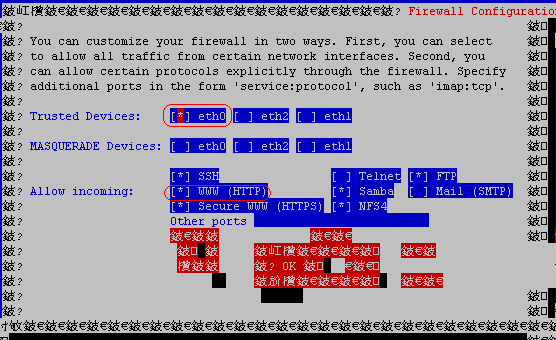
或者直接disable

网上摘录的一段方案
1.检查防火墙状态
[root@iZ288zn7gymZ ~]# service iptables status
Redirecting to /bin/systemctl status iptables.service
iptables.service - IPv4 firewall with iptables
   Loaded: loaded (/usr/lib/systemd/system/iptables.service; enabled)
   Active: active (exited) since Wed 2016-11-02 23:10:51 CST; 14min ago
  Process: 12024 ExecStop=/usr/libexec/iptables/iptables.init stop (code=exited, status=0/SUCCESS)
  Process: 12078 ExecStart=/usr/libexec/iptables/iptables.init start (code=exited, status=0/SUCCESS)
 Main PID: 12078 (code=exited, status=0/SUCCESS)
Nov 02 23:10:51 iZ288zn7gymZ iptables.init[12078]: iptables: Applying firewall rules: [ OK ]
Nov 02 23:10:51 iZ288zn7gymZ systemd[1]: Started IPv4 firewall with iptables.
正常启动。
2.查看是否放开mysql端口
[root@iZ288zn7gymZ ~]# iptables -L -n
或者
iptables --list
Chain INPUT (policy DROP)

target prot opt source destination
ACCEPT all -- 0.0.0.0/0 0.0.0.0/0
ACCEPT all -- 0.0.0.0/0 0.0.0.0/0 state RELATED,ESTABLISHED
ACCEPT tcp -- 0.0.0.0/0 0.0.0.0/0 state NEW tcp dpt:22
ACCEPT tcp -- 0.0.0.0/0 0.0.0.0/0 state NEW tcp dpt:80
ACCEPT tcp -- 0.0.0.0/0 0.0.0.0/0 state NEW tcp dpt:21
ACCEPT tcp -- 0.0.0.0/0 0.0.0.0/0 state NEW tcp dpt:3306
ACCEPT tcp -- 0.0.0.0/0 0.0.0.0/0 state NEW tcp dpt:443
ACCEPT icmp -- 0.0.0.0/0 0.0.0.0/0 limit: avg 100/sec burst 100
ACCEPT icmp -- 0.0.0.0/0 0.0.0.0/0 limit: avg 1/sec burst 10
syn-flood tcp -- 0.0.0.0/0 0.0.0.0/0 tcp flags:0x17/0x02
REJECT all -- 0.0.0.0/0 0.0.0.0/0 reject-with icmp-host-prohibited
如果没有 3306 加入防火墙规则:
iptables -A INPUT -p tcp -m state --state NEW -m tcp --dport 3306 -j ACCEPT
注意这样只能临时加入防火墙 需要把规则save到 /etc/sysconfig/iptables 文件下
[root@iZ288zn7gymZ ~]# service iptables save
iptables: Saving firewall rules to /etc/sysconfig/iptables:[ OK ]
或者简单粗暴, 直接vim /etc/sysconfig/iptables
增加一行 -A INPUT -p tcp -m state --state NEW -m tcp --dport 3306 -j ACCEPT
然后重启防火墙:
[root@iZ288zn7gymZ ~]# service iptables restart
常见问题
[root@localhost bin]# apachectl -k stop
httpd: Could not open configuration file /etc/httpd/conf/httpd.conf: No such file or directory
解决办法之一:
/usr/local/apache2/bin /apachectl -f /usr/local/apache2/conf/httpd.conf -k stop
即将httpd.conf路径给全
方法之二:
[root@localhost bin]# /usr/local/apache2/bin/apachectl -k stop
ExtractionError: Can't extract file(s) to egg cache
ExtractionError: Can't extract file(s) to egg cache
The following error occurred while trying to extract file(s) to the Python egg cache:
[Errno 13] Permission denied: '/root/.cache'
The Python egg cache directory is currently set to:
/root/.cache/Python-Eggs
Perhaps your account does not have write access to this directory? You can change the cache directory by setting the PYTHON_EGG_CACHE environment variable to point to an accessible directory.
解决方案如下
mkdir /var/www/cache
chmod 777 /var/www/cache
export PYTHON_EGG_CACHE=/var/www/cache
Python 安装
安装
# tar -zxvf Python-2.7.3.tgz
# ./configure --prefix=/usr/local/python2.7.3 --enable-shared --with-zlib=/usr/local/zlib
这里,必须用-enable-shared,生成动态库,否则会遇到wsgi不能编译的问题。
如果要支持django,这里要支持zlib,否则ImportError: No module named zlib
# make
# sudo make install
链接到最新Python
cd /usr/bin
sudo mv python python2.4
sudo ln -s /usr/local/python2.7.3/bin/python python
否则
[root@localhost bin]# python
bash: /usr/bin/python: No such file or directory
修改yum
vi /usr/bin/yum
#!/usr/bin/python
改为
#!/usr/bin/python2.4
否则yum会因为版本不一致而无法使用
[root@@localhost bin]# yum
No module named yum
用ldconfig指定库路径
sudo ldconfig /usr/local/python2.7.3/lib/
否则
[root@localhost bin]# python
python: error while loading shared libraries: libpython2.7.so.1.0: cannot open shared object file: No such file or directory
找不到库,需用ldconfig指定库路径
检查python版本
python –V
mod_wsgi 安装
# wget http://modwsgi.googlecode.com/files/mod_wsgi-3.4.tar.gz
# ./configure -with-apxs=/usr/local/apache2/bin/apxs -with-python=/usr/local/python2.7.3/bin/python2.7
# make
# sudo make install
配置
修改httpd.conf配置,增加
LoadModule wsgi_module modules/mod_wsgi.so
检查一下模块
# cd /usr/local/apache2/bin
# apachectl –l
Compiled in modules:
core.c
mod_so.c
http_core.c
event.c
wsgi_module会出现在下面的modules里面
# apachectl -M
Loaded Modules:
core_module (static)
so_module (static)
http_module (static)
mpm_event_module (static)
authn_file_module (shared)
authn_core_module (shared)
authz_host_module (shared)
authz_groupfile_module (shared)
authz_user_module (shared)
authz_core_module (shared)
access_compat_module (shared)
auth_basic_module (shared)
reqtimeout_module (shared)
filter_module (shared)
mime_module (shared)
log_config_module (shared)
env_module (shared)
headers_module (shared)
setenvif_module (shared)
version_module (shared)
unixd_module (shared)
status_module (shared)
autoindex_module (shared)
dir_module (shared)
alias_module (shared)
rewrite_module (shared)
wsgi_module (shared)
Mysql安装
编译和安装
[root@localhost mysql-5.1.70]#./configure '--prefix=/usr/local/mysql' '--without-debug' '--with-charset=utf8' '--with-extra-charsets=all' '--enable-assembler' '--with-pthread' '--enable-thread-safe-client' '--with-mysqld-ldflags=-all-static' '--with-client-ldflags=-all-static' '--with-big-tables' '--with-readline' '--with-ssl' '--with-embedded-server' '--enable-local-infile' '--with-plugins=innobase'
[root@localhost mysql-5.1.70]# make
[root@localhost mysql-5.1.70]# make install
权限
[root@localhost Django-1.5.5]# /usr/sbin/groupadd mysql
[root@localhost Django-1.5.5]# /usr/sbin/useradd -g mysql mysql
配置选项
安装mysql选项文件
[root@localhost Django-1.5.5]# cp /usr/local/mysql/share/mysql/my-medium.cnf /etc/my.cnf
mysql设置开机自启动
[root@localhost Django-1.5.5]# cp -r /usr/local/mysql/share/mysql/mysql.server /etc/init.d/mysqld
[root@localhost Django-1.5.5]# /sbin/chkconfig --del mysqld
[root@localhost Django-1.5.5]# /sbin/chkconfig --add mysqld
配置权限表
[root@localhost Django-1.5.5]# chown -R mysql:mysql /usr/local/mysql
[root@localhost Django-1.5.5]# /usr/local/mysql/bin/mysql_install_db --user=mysql
启动mysql
[root@localhost Django-1.5.5]# /etc/init.d/mysqld start
mysql初始化配置:
export PATH=/usr/local/mysql/bin:$PATH
/usr/local/mysql/bin/mysql_secure_installation
加载到bin下面
ln -s /usr/local/mysql/bin/mysql /usr/bin
这样可以任意位置运行
常见问题
ERROR 1045 (28000): Access denied for user 'mysql'@'localhost' (using password: NO)
方法1
[root@localhost Django-1.5.5]#/etc/init.d/mysqld stop
[root@localhost Django-1.5.5]#/usr/local/mysql/bin/mysqld_safe --skip-grant-tables
[root@localhost Django-1.5.5]#mysql
mysql>use mysql
mysql>update user set password=password("123") where user="root";
mysql>flush privileges;
mysql>exit
[root@localhost Django-1.5.5]#/etc/init.d/mysqld start
方法2
[root@localhost Django-1.5.5]# /etc/init.d/mysqld stop
[root@localhost Django-1.5.5]# mysql -u root mysql
mysql> UPDATE user SET Password=123 where USER='root' and host='root' or host='localhost';
mysql> FLUSH PRIVILEGES;
mysql> quit
支持中文
修改my.cnf或my.ini(只有修改配置文件,并重启服务器,才能永久生效)
vi /etc/my.cnf
在[client]下添加,client为控制客户端的,没试过,没有的可以不需要加。
default-character-set=utf8
在[mysqld]下添加,mysqld为控制服务器端的,改过了,OK。
default-character-set=utf8
3.service mysqld restart,重启。
MySQLdb安装
[root@localhost MySQL-python-1.2.3]# python setup.py install
常见问题
command ‘gcc’ failed with exit status 1
1.该编译安装mysql 同时修改# vim site.cfg
mysql_config = /path/to/mysql_config
example : mysql_config = /usr/local/mysql/bin/mysql_config
2.使用
# yum install MySQL-p*
Django 安装
[root@localhost sw]# tar zxvf Django-1.5.5.tar.gz
[root@localhost Django-1.5.5]# python setup.py install
工程文件放到 /var/www
修改/usr/local/apache2/conf/httpd.conf,加载mod_wsgi和添加apache配置文件路径
LoadModule wsgi_module modules/mod_wsgi.so
Include "/var/www/voith_sales/Rail/apache/apache_django_wsgi.conf"
修改/var/www/voith_sales/Rail/apache/apache_django_wsgi.conf
    DocumentRoot "/var/www/voith_sales/Rail"
    <Directory "/var/www/voith_sales/Rail/static">
        Order allow,deny
        Allow from all
    </Directory>

    Alias /index/Rail/static "/var/www/voith_sales/Rail/static"
    WSGIScriptAlias / "/var/www/voith_sales/Rail/apache/django.wsgi"
    <Directory "/var/www/voith_sales/Rail">
        Options FollowSymLinks Includes ExecCGI
        AllowOverride None
        Order deny,allow
        Allow from all
</Directory>
常见问题
Permission denied: ‘/root/.python-eggs’
[root@localhost site-packages]# cd /usr/local/lib/python2.7/site-packages
[root@localhost site-packages]# ls
django Django-1.5.5-py2.7.egg-info easy-install.pth MySQL_python-1.2.3-py2.7-linux-i686.egg README setuptools-2.2-py2.7.egg setuptools.pth
[root@localhost site-packages]# mv MySQL_python-1.2.3-py2.7-linux-i686.egg foo.zip
[root@localhost site-packages]# mkdir MySQL_python-1.2.3-py2.7-linux-i686.egg
[root@localhost site-packages]# cd MySQL_python-1.2.3-py2.7-linux-i686.egg/
[root@localhost MySQL_python-1.2.3-py2.7-linux-i686.egg]# unzip ../foo.zip
解决办法是在开始的文件前面加上了这段代码
import os,sys
os.environ['PYTHON_EGG_CACHE'] = '/tmp/.python-eggs'
abspath = os.path.dirname(__file__)
sys.path.append(abspath)
os.chdir(abspath)
403 Forbidden You don't have permission to access /folder-name/ on this server
<Directory />
    AllowOverride none
    #Require all denied
</Directory>

<Files ".ht*">
    #Require all denied
</Files>

[root@localhost bin]# sudo chown -R $USER:$USER /var/www/voith_sales
[root@localhost bin]# sudo chmod -R 755 /var/www
ImproperlyConfigured: Error loading MySQLdb module: libmysqlclient_r.so
[root@localhost bin]# ln -s /usr/local/mysql/lib/mysql/libmysqlclient* /usr/lib
[root@localhost bin]# ldconfig # 重新加载
httpd: Syntax error on line 147 of /usr/local/apache2/conf/httpd.conf: Cannot load modules/mod_wsgi.so into server: libpython2.7.so.1.0
[root@localhost bin]# sudo ldconfig /usr/local/python2.7.3/lib/
Linux操作
Linux关闭防火墙和打开防火墙关键字: 防火墙 永久打开或则关闭
chkconfig iptables on
chkconfig iptables off
即时生效:重启后还原
service iptables start
service iptables stop
查看CentOS防火墙信息:
/etc/init.d/iptables status
关闭CentOS防火墙服务:
/etc/init.d/iptables stop
常见问题
bash: ifconfig: command not found
在一般用户的 home 目录下的 文件 .bashrc 加入
export PATH=$PATH:/sbin
然后执行 source .bashrc 就可以执行 ifconfig 命令了。
Zlib安装
[root@localhost zlib-1.2.8]# ./configure --prefix=/usr/local/zlib
[root@localhost zlib-1.2.8]# make
[root@localhost zlib-1.2.8]# make install
  File "/usr/local/python2.7.3/lib/python2.7/zipfile.py", line 681, in __init__
    "Compression requires the (missing) zlib module"
RuntimeError: Compression requires the (missing) zlib module
重新编译python,只需要下面这句
# ./configure --with-zlib
cd /usr/bin
sudo mv python python2.4
sudo ldconfig /usr/local/python2.7.3/lib/
nurse安装
http://ftp.gnu.org/pub/gnu/ncurses/
Setuptool安装
[root@localhost setuptools-2.2]# python setup.py install