最近在研究边缘计算,想在一个实际平台上做一下练习,最后选了openairinterface开源软件。
OpenAirInterface(OAI),又称OpenAirInterface5g,是欧洲EURECOM组织发起并维护的一个开源SDR LTE项目,是目前最为完善的开源SDR LTE平台。
OpenAirInterfaceTM(OAI)无线技术平台是面向开放LTE生态系统的灵活平台。 该平台提供了基于开源软件的LTE系统实现,涵盖了E-UTRAN和EPC中的3GPP标准的完整协议栈。 它可用于在PC上构建和定制LTE基站(OAI eNB),用户设备(OAI UE)和核心网(OAI EPC)。 OAI eNB可以连接到商用UE或OAI UE,以测试不同的配置和网络设置并实时监控网络和移动设备。 此外,OAI UE可以连接到eNB测试设备(CMW500),并且在2016年12月已经与商用eNB一起进行了一些试验。
准备工作
工具安装
VirtualBox
OAI有多种部署形式,而且刚开始安装时会有各种内核和版本的尝试,所以推荐用虚拟机做尝试。但是后面部署OAI-RAN,因为无线通信对时延的要求,还是需要在实体机上。
下载VirtualBox,我当前版本5.2.6
Bitvise SSH Client
Virtualbox拷贝操作等不方便,我尝试了几次都不能成功在虚拟机和host主机之间拷贝数据,就干脆直接通过Bitvise SSH Client来操作
ubuntu版本
官方文档推荐Ubuntu 14.04 LTS
We only test Ubuntu 14.04 extensively, so please do not try any other distribution for the first time.
实际使用中发现,14.03使用中有很多authentication的问题,最好选用16.04版本,这个版本比较稳定,网上资料很多也是基于这个版本较多。
库下载位置:http://old-releases.ubuntu.com/releases/16.04.5/
如果安装的desktop版本,默认不按照SSH server,需要额外安装一下
sudo apt-get install openssh-server
检查Linux版本
命令1lsb_release -a
oai@ubuntu:~$ lsb_release -a
No LSB modules are available.
Distributor ID: Ubuntu
Description: Ubuntu 14.04.1 LTS
Release: 14.04
Codename: trusty
命令2 /etc/lsb-release
oai@ubuntu:~$ cat /etc/lsb-release
DISTRIB_ID=Ubuntu
DISTRIB_RELEASE=14.04
DISTRIB_CODENAME=trusty
DISTRIB_DESCRIPTION="Ubuntu 14.04.1 LTS"
Wireshark
wireshark安装,用于后面测试包分析
git常见操作
查看当前所属branch
git branch -vv git config --lis
查看当前commit
git rev-parse HEAD git log -1
工具配置
apt-get库源更换为国内源
1、原文件备份
sudo cp /etc/apt/sources.list /etc/apt/sources.list.bak
2、编辑源列表文件
sudo vim /etc/apt/sources.list
3、将原来的列表删除,添加如下内容
# 默认注释了源码镜像以提高 apt update 速度,如有需要可自行取消注释
deb https://mirrors.tuna.tsinghua.edu.cn/ubuntu/ xenial main restricted universe multiverse
# deb-src https://mirrors.tuna.tsinghua.edu.cn/ubuntu/ xenial main restricted universe multiverse
deb https://mirrors.tuna.tsinghua.edu.cn/ubuntu/ xenial-updates main restricted universe multiverse
# deb-src https://mirrors.tuna.tsinghua.edu.cn/ubuntu/ xenial-updates main restricted universe multiverse
deb https://mirrors.tuna.tsinghua.edu.cn/ubuntu/ xenial-backports main restricted universe multiverse
# deb-src https://mirrors.tuna.tsinghua.edu.cn/ubuntu/ xenial-backports main restricted universe multiverse
deb https://mirrors.tuna.tsinghua.edu.cn/ubuntu/ xenial-security main restricted universe multiverse
# deb-src https://mirrors.tuna.tsinghua.edu.cn/ubuntu/ xenial-security main restricted universe multiverse
# 预发布软件源,不建议启用
# deb https://mirrors.tuna.tsinghua.edu.cn/ubuntu/ xenial-proposed main restricted universe multiverse
# deb-src https://mirrors.tuna.tsinghua.edu.cn/ubuntu/ xenial-proposed main restricted universe multiverse
4、运行
sudo apt-get update
pip源更新为清华
修改 ~/.pip/pip.conf (没有就创建一个), 内容如下:
[global]
index-url = https://pypi.tuna.tsinghua.edu.cn/simple
default-timeout = 1000 # 如果出现ConnectTimeoutError可以考虑加这行
git参数更新
如果出现error: RPC failed; result=22, 考虑增加postBuffer,当然,最好的办法还是科学上网
git config --global http.postBuffer 1G
git config --global https.postBuffer 1G
https://docs.microsoft.com/en-us/archive/blogs/congyiw/git-stop-changing-http-postbuffer
网络拓扑
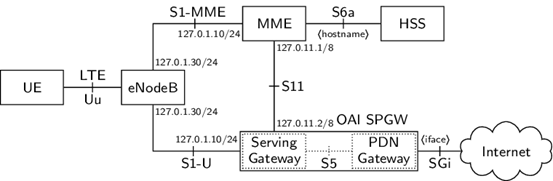
整个网络的拓扑如下:网络包括三个主要部分,终端、无线接入及核心网络。边缘网络会在后续文章介绍。
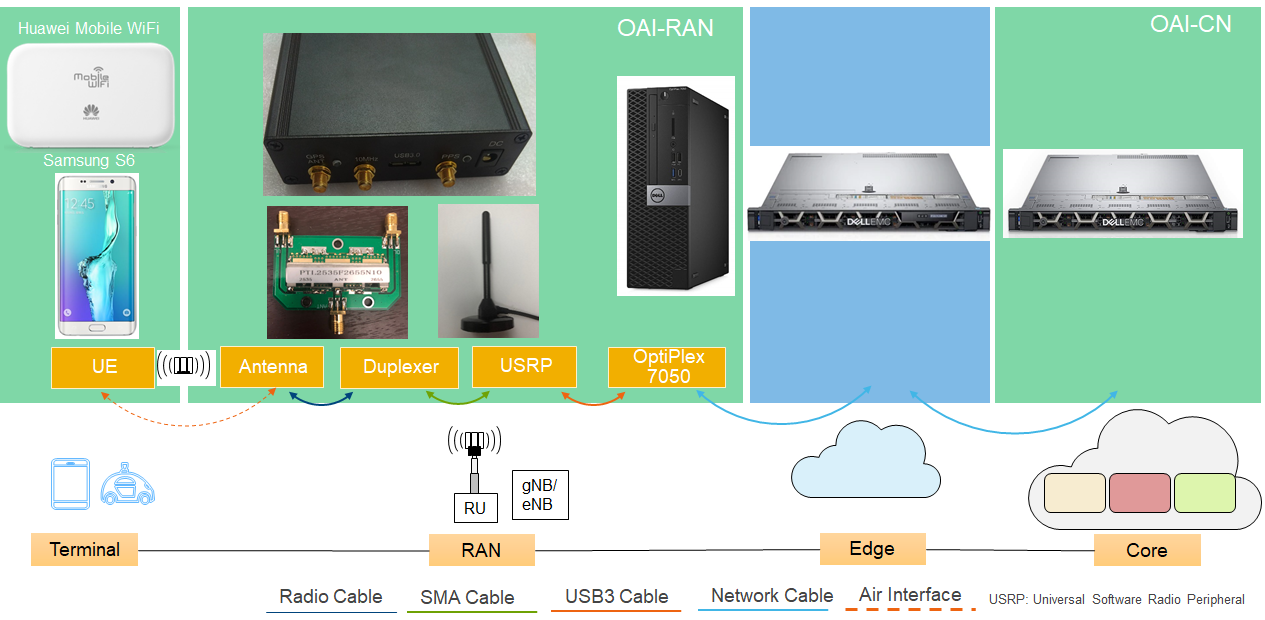
尝试过2种无线连接方式:
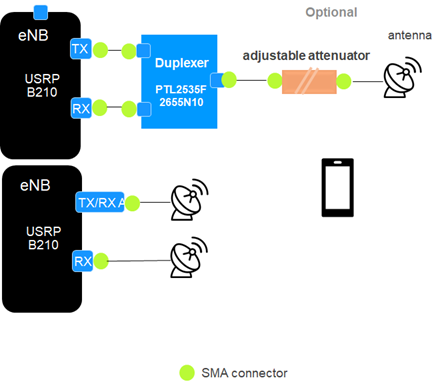
为简单起见,本文的配置都采用单机模式,配置如下:
openairinterface5g
Kernal Setup
- install low-latency kernel
- disable CPU freq. scaling
- disable C-states from BIOS (or from GRUB)
01. Low-latency kernel installation 切换至Ubuntu 低延迟内核
我采用的是v4.9.108版本,安装方法如下
获取kernel build https://kernel.ubuntu.com/~kernel-ppa/mainline/v4.9.108/
使用dpkg命令安装
cd /tmp/
wget http://kernel.ubuntu.com/~kernel-ppa/mainline/v4.9/linux-headers-4.9.0-040900_4.9.0-040900.201612111631_all.deb
wget http://kernel.ubuntu.com/~kernel-ppa/mainline/v4.9/linux-headers-4.9.0-040900-generic_4.9.0-040900.201612111631_amd64.deb
wget http://kernel.ubuntu.com/~kernel-ppa/mainline/v4.9/linux-image-4.9.0-040900-generic_4.9.0-040900.201612111631_amd64.deb
sudo dpkg -i *.deb
检查安装结果
oai@oai:~$ sudo dpkg --get-selections |grep linux-image
linux-image-4.4.0-21-generic install
linux-image-4.9.108-0409108-generic install
linux-image-4.9.108-0409108-lowlatency install
linux-image-extra-4.4.0-21-generic install
linux-image-generic install
使用 uname -r 获取当前kernel
oai@oai:~$ uname -r
4.9.108-0409108-lowlatency
02. Disable CPU Frequency scaling 关闭睿频
安装cpufrequtils:
sudo apt-get install cpufrequtils
编辑下面文件,如果不存在,则创建一个新的文件:
sudo vi /etc/default/cpufrequtils
添加下面行:
GOVERNOR="performance"
保存并退出.
现在,你需要禁用ondemand daemon守护进程, 否则重启之后你的设置会被重写.
sudo update-rc.d ondemand disablesudo /etc/init.d/cpufrequtils restart
你可以用下面的命令检查你的设置:
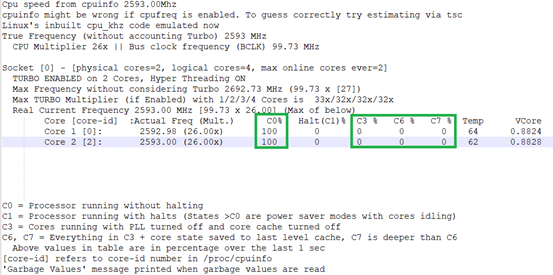
cpufreq-info # 查看睿频是否成功关闭(频率变动极小)
它将会显示处理器每个内核的信息。检查是否所有处理器均处于性能模式,并以处理器的最大速度运行。
03. Power management 删除BIOS中的所有电源管理功能(睡眠状态,特别是C状态)
sudo vi /etc/default/grub #
禁用 p-state 和 c-state, 添加 intel_pstate=disable 到Linux的启动项, 即在/etc/default/grub添加 GRUB_CMDLINE_LINUX_DEFAULT="quiet intel_pstate=disable", 接着执行update-grub.
下面设置内容可选 "processor.max_cstate=1 intel_idle.max_cstate=0 idle=poll"
在文件/etc/modprobe.d/blacklist.conf文末添加"blacklist intel_powerclamp", 将Intel的电源管理 intel_powerclamp module加入黑名单.
sudo vi /etc/modprobe.d/blacklist.conf
blacklist intel_powerclamp
sudo reboot
安装 i7z 工具来检查CPU
sudo apt-get install i7z
sudo i7z
也可以执行完整脚本
$ sudo apt-get install cpufrequtils
$ sudo touch /etc/default/cpufrequtils
$ sudo sed -i "/GOVERNOR.*/d" /etc/default/cpufrequtils
$ test -s /etc/default/cpufrequtils && sudo sed -i '$a\GOVERNOR=\"performance\"' /etc/default/cpufrequtils || echo "GOVERNOR=\"performance\"" | sudo tee /etc/default/cpufrequtils
$ sudo update-rc.d ondemand disable
$ sudo reboot
修改之前是这样,C3,C6,C7上都有

改成低时延之后如下,只有C0有值
获取源文件
安装git
sudo apt-get update
sudo apt-get install subversion git
执行下面步骤,否则下载依赖库会出错 - 将gitlab.eurecom.fr 的证书添加到你的Ubuntu 14.04安装:
echo -n | openssl s_client -showcerts -connect gitlab.eurecom.fr:443 2>/dev/null | sed -ne '/-BEGIN CERTIFICATE-/,/-END CERTIFICATE-/p' | sudo tee -a /etc/ssl/certs/ca-certificates.crt
- 如果你没有
/etc/ssl目录的root访问权限,禁止证书检查
git config --global http.sslverify false
下载源代码
- 如果要从git库上拿,先执行
sudo apt-get update
sudo apt-get install git
git clone https://gitlab.eurecom.fr/oai/openairinterface5g.git
- 也可以直接从本地文件解压
tar -xzvf openairinterface5g.tar.gz
安装依赖文件
cd openairinterface5g
source oaienv #Very important. It sets the correct environment variables.
cd cmake_targets
./build_oai -I #need to run only once
编译&运行eNB:
cd ~/openairinterface5g
source oaienv
./cmake_targets/build_oai -w USRP -x -c --eNB
cd cmake_targets/lte_build_oai/build
sudo -E ./lte-softmodem -O $OPENAIR_DIR/targets/PROJECTS/GENERIC-LTE-EPC/CONF/enb.band7.tm1.usrpb210.conf -d
sudo -E ./lte-softmodem -h #(to see help options)
enb.band7.tm1.usrpb210.conf是老文件名,可以参考它的新生成的文件名更新到相应的配置,比如band7, prb50
Issue #1 OAI-RAN problems binding port
https://gitlab.eurecom.fr/oai/openairinterface5g/issues/151 The above problem is because of continuous running of the lte-softmodem in the background, even though you have terminated it manually. Using the following commands can solve the problem.Hope this helps! sudo pkill -9 lte-softmodem sudo netstat -tulp|grep 2152
如何OAI-RAN和OAI-CN装在一台机器上会有上述问题,open-cells改了源码好像这个问题能避开,我用snap安装的OAI-CN,然后源码安装的OAI-RAN也能正常启动
openair-cn
内核(4.9.x)
build_spgw -i 安装必须内核版本4.9以上,一种方法是直接安装kernel 4.9,但是编译源码时有时会出问题;另一种方法是安装kernel4.8,手动安装libgtpnl
源文件选择
https://gitlab.eurecom.fr/oai/openair-cn
解压源文件
tar -xzvf openair-cn.tar.gz
安装依赖文件
cd openair-cn
git checkout develop
git pull
source oaienv
cd SCRIPTS
./build_hss -i#Need to run only once to install missing packages
安装过程中会提示一些软件是否需要安装,如果没有选择yes,安装过的可选no跳过
如果这儿没有提示phpmyadmin安装,后面可以手动安装
./build_mme -i#Need to run only once to install missing packages
./build_spgw -i#Need to run only once
给EPC指定FQDN
查看主机名
oaicn@oaicn:$ cat /etc/hostname
oaicn
在/etc/hosts填写FQDN:
oaicn@oaicn:$ cat /etc/hosts
127.0.0.1 localhost
127.0.1.1 oaicn.openair4G.eur oaicn
127.0.1.1 hss.openair4G.eur hss
oaicn@oaicn:$ hostname
oaicn
oaicn@oaicn:$ hostname-f
oaicn.openair4G.eur
配置文件
将EPC配置文件拷贝到/usr/local/etc/oai
sudo mkdir -p /usr/local/etc/oai/freeDiameter
sudo cp ~/openair-cn/ETC/mme.conf /usr/local/etc/oai
sudo cp ~/openair-cn/ETC/hss.conf /usr/local/etc/oai
sudo cp ~/openair-cn/ETC/spgw.conf /usr/local/etc/oai
sudo cp ~/openair-cn/ETC/acl.conf /usr/local/etc/oai/freeDiameter
sudo cp ~/openair-cn/ETC/mme_fd.conf /usr/local/etc/oai/freeDiameter
sudo cp ~/openair-cn/ETC/hss_fd.conf /usr/local/etc/oai/freeDiameter
mme.conf
MME配置文件修改如下 (/usr/local/etc/oai/mme.conf):
REALM = "openair4G.eur";
S6A :
{
   S6A_CONF = "/usr/local/etc/oai/freeDiameter/mme_fd.conf"; # YOUR MME freeDiameter config file path
   HSS_HOSTNAME = "hss"; # THE HSS HOSTNAME
 };
GUMMEI_LIST = (
   {
      MCC="208" ; MNC="92"; MME_GID="4" ; MME_CODE="1";
   } # YOUR GUMMEI CONFIG HERE
);
TAI_LIST = (
{
    MCC="208" ; MNC="92"; TAC = "1"; } # YOUR PLMN CONFIG HERE
);
NETWORK_INTERFACES :
{
    # MME binded interface for S1-C or S1-MME communication (S1AP), can be ethernet interface, virtual ethernet interface, we don't advise wireless interfaces
    MME_INTERFACE_NAME_FOR_S1_MME = "eth0"; # YOUR NETWORK CONFIG HERE
    MME_IPV4_ADDRESS_FOR_S1_MME = "192.168.12.62/24"; # YOUR NETWORK CONFIG HERE
    # MME binded interface for S11 communication (GTPV2-C)
    MME_INTERFACE_NAME_FOR_S11_MME = "lo"; # YOUR NETWORK CONFIG HERE
    MME_IPV4_ADDRESS_FOR_S11_MME = "127.0.11.1/8"; # YOUR NETWORK CONFIG HERE
    MME_PORT_FOR_S11_MME = 2123; # YOUR NETWORK CONFIG HERE
};
S-GW :
{
    # S-GW binded interface for S11 communication (GTPV2-C), if none selected the ITTI message interface is used
    SGW_IPV4_ADDRESS_FOR_S11 = "127.0.11.2/8"; # YOUR NETWORK CONFIG HERE
};
spgw.conf
SPGW配置文件修改如下 (/usr/local/etc/oai/spgw.conf):
S-GW :
{
    NETWORK_INTERFACES :
    {
        # S-GW binded interface for S11 communication (GTPV2-C), if none selected the ITTI message interface is used
        SGW_INTERFACE_NAME_FOR_S11 = "lo"; # YOUR NETWORK CONFIG HERE
        SGW_IPV4_ADDRESS_FOR_S11 = "127.0.11.2/8"; # YOUR NETWORK CONFIG HERE
        # S-GW binded interface for S1-U communication (GTPV1-U) can be ethernet interface, virtual ethernet interface, we don't advise wireless interfaces
        SGW_INTERFACE_NAME_FOR_S1U_S12_S4_UP = "eth0"; # YOUR NETWORK CONFIG HERE, USE "lo" if S-GW run on eNB host
        SGW_IPV4_ADDRESS_FOR_S1U_S12_S4_UP = "192.168.12.62/24"; # YOUR NETWORK CONFIG HERE
        SGW_IPV4_PORT_FOR_S1U_S12_S4_UP = 2152; # PREFER NOT CHANGE UNLESS YOU KNOW WHAT YOU ARE DOING
        # S-GW binded interface for S5 or S8 communication, not implemented, so leave it to none
        SGW_INTERFACE_NAME_FOR_S5_S8_UP = "none"; # DO NOT CHANGE (NOT IMPLEMENTED YET)
        SGW_IPV4_ADDRESS_FOR_S5_S8_UP = "0.0.0.0/24"; # DO NOT CHANGE (NOT IMPLEMENTED YET)
    };
...
}
P-GW =
{
    NETWORK_INTERFACES :
    {
        # P-GW binded interface for S5 or S8 communication, not implemented, so leave it to none
        PGW_INTERFACE_NAME_FOR_S5_S8 = "none"; # DO NOT CHANGE (NOT IMPLEMENTED YET)
        PGW_IPV4_ADDRESS_FOR_S5_S8 = "0.0.0.0/24"; # DO NOT CHANGE (NOT IMPLEMENTED YET)
        # P-GW binded interface for SGI (egress/ingress internet traffic)
        PGW_INTERFACE_NAME_FOR_SGI = "eth0"; # YOUR NETWORK CONFIG HERE
        PGW_MASQUERADE_SGI = "yes"; # YOUR NETWORK CONFIG HERE
       UE_TCP_MSS_CLAMPING = "no"; # STRING, {"yes", "no"}.
    };
...
   # DNS address communicated to UEs
    DEFAULT_DNS_IPV4_ADDRESS = "192.168.106.12"; # YOUR NETWORK CONFIG HERE
    DEFAULT_DNS_SEC_IPV4_ADDRESS = "192.168.12.100"; # YOUR NETWORK CONFIG HERE
...
}
mme_fd.conf
MME freediameter 配置文件 (/usr/local/etc/oai/freeDiameter/mme_fd.conf):
Identity = "oai.openair4G.eur";
Realm = "openair4G.eur";
ConnectPeer= "hss.openair4G.eur" { ConnectTo = "127.0.0.1"; No_SCTP ; No_IPv6; Prefer_TCP; No_TLS; port = 3868; realm = "openair4G.eur";};
hss.conf
HSS配置文件(/usr/local/etc/oai/hss.conf):
MYSQL_user = "root";
MYSQL_pass = "linux"; #Put here the root password of mysql database that was provided during installation
OPERATOR_key = "1006020f0a478bf6b699f15c062e42b3"; # OP key for oai_db.sql, Must match to that of UE Sim card, OP_Key
hss_fd.conf
HSS freediameter配置文件 (/usr/local/etc/oai/freeDiameter/hss_fd.conf):
Identity = "hss.openair4G.eur";
Realm = "openair4G.eur";
acl.conf
ALLOW_OLD_TLS *.openair4G.eur
安装证书certificates:
cd ~/openair-cn/SCRIPTS
./check_hss_s6a_certificate /usr/local/etc/oai/freeDiameter/ hss.openair4G.eur
./check_mme_s6a_certificate /usr/local/etc/oai/freeDiameter/ nano.openair4G.eur
编译&运行
编译&运行 HSS (HSS必须第一个运行):
cd ~/openair-cn
cd SCRIPTS
./build_hss -c
./run_hss -i ~/openair-cn/src/oai_hss/db/oai_db.sql #Run only once to install database
./run_hss # Run this for all subsequent runs
运行的log如下
[...]
Initializing S6a layer: DONE
编译&运行MME:
cd ~/openair-cn/SCRIPTS
./build_mme -c
./run_mme
运行log打印如下,最后一行表明MME处于STATE_OPEN状态
[...]
'<hostname>.openair4G.eur' in state 'STATE_OPEN' waiting for next event.
Diameter identity of MME: <hostname>.openair4G.eur with length: 21
S6a peer connection attempt 1 / 8
Peer <hostname>.openair4G.eur is now connected...
在HSS窗口, 将会打印跟连接的MME相关的输出. 最后一行显示如下:
’STATE_CLOSED' -> 'STATE_OPEN' '<hostname>.openair4G.eur'
Issue # 1: mme compile error on gitlab source code
oai@oai:~/openair-cn/SCRIPTS$ sudo ./build_mme -c
Clean the build generated files (build from scratch)
mkdir: created directory 'BUILD'
Build type is Debug
Architecture is x86_64
git found: /usr/bin/git
mme compilation failed
cp: cannot stat '/home/oai/openair-cn/BUILD/MME/BUILD/mme': No such file or directory
auth_request compilation failed
解决方案: ./build_mme -i -f
参考:https://github.com/OPENAIRINTERFACE/openair-cn/issues/28
I have addressed this problem by manually deleting and reinstalling nettle
编译&安装SP-GW:
cd ~/openair-cn
cd SCRIPTS
./build_spgw -c
./run_spgw
运行log如下:
[...]
Initializing SPGW-APP task interface: DONE
数据库和用户
Step 1: 安装Phpmyadmin (可选)
在运行./build_hss -i 时会安装MySQL和pypmyadmin。一般设置MySQL的用户名为 root ,密码为 linux ; phpmyadmin 的用户名为 root ,密码为 linux.安装成功后在浏览器中输入: http://127.0.0.1/phpmyadmin 如果成功安装MySQL和phpmyadmin的话,便可以输入phpmyadmin的用户名和密码访问数据库。
或者访问主机IP http://192.168.1.31/phpmyadmin/

如果访问不成功,运行命令:
sudo apt-get install phpmyadmin
sudo ln -s /etc/phpmyadmin/apache.conf /etc/apache2/conf-available/phpmyadmin.conf
sudo a2enconf phpmyadmin
sudo /etc/init.d/apache2 reload
此时,应该就能访问了。
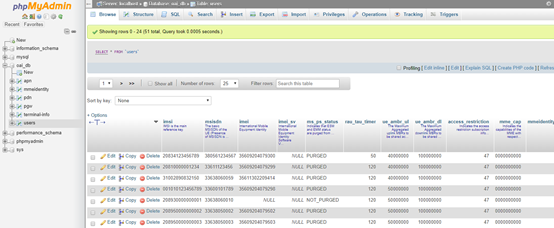
Step 2: 在数据表oai_db.users里添加用户
接下来可以查看oai_db数据库,默认创建了10个用户 ; 也可以通过SQL添加新的用户
shell > mysql -u root -p
# The password is "linux"
mysql > use oai_db;
# show all tables
mysql > show tables;
# show all entries in mmeidentity
mysql > select * from mmeidentity;
mysql > INSERT INTO users (`imsi`, `msisdn`, `imei`, `imei_sv`, `ms_ps_status`, `rau_tau_timer`, `ue_ambr_ul`, `ue_ambr_dl`, `access_restriction`, `mme_cap`, `mmeidentity_idmmeidentity`, `key`, `RFSP-Index`, `urrp_mme`, `sqn`, `rand`, `OPc`) VALUES ('208930000000001', '33638060010', NULL, NULL, 'PURGED', '120', '50000000', '100000000', '47', '0000000000', '3', 0x8BAF473F2F8FD09487CCCBD7097C6862, '1', '0', '', 0x00000000000000000000000000000000, '');
几个注意点:
- msisdn: 虽然它是可选的,但是这个字段不能空白,因为OAI会检查这个字段值是否存在(任何值都可以).
- OPc: OPc 从OP和Key计算而来. 该字段可以为空,因为HSS会自动计算
- EPC/MME主机名: 如果你使用的跟wiki不一样的主机名,你也需要在HSS数据库进行修改.
Step 3: 更新数据表oai_db.mmeidentity和oai_db.pdn
shell > mysql -u root -p
# The password is "linux"
mysql > use oai_db;
mysql > INSERT INTO pdn (`id`, `apn`, `pdn_type`, `pdn_ipv4`, `pdn_ipv6`, `aggregate_ambr_ul`, `aggregate_ambr_dl`, `pgw_id`, `users_imsi`, `qci`, `priority_level`,`pre_emp_cap`,`pre_emp_vul`, `LIPA-Permissions`) VALUES ('60', 'oai.ipv4','IPV4', '0.0.0.0', '0:0:0:0:0:0:0:0', '50000000', '100000000', '3', '208930000000001', '9', '15', 'DISABLED', 'ENABLED', 'LIPA-ONLY');
mysql > INSERT INTO mmeidentity (`idmmeidentity`,`mmehost`,`mmerealm`,`UE-reachability`) VALUES ('6','nano.openair4G.eur','openair4G.eur','0');
mysql > INSERT INTO mmeidentity (`idmmeidentity`,`mmehost`,`mmerealm`,`UE-reachability`) VALUES ('7','calisson.openair4G.eur','openair4G.eur','0');