搭建环境
虚拟机 及访问工具
虚拟机
免费:Oracle VM VirtualBox
img: ubuntu-18.04.1-server-amd64.iso
安装虚拟机时可能会碰到下面问题
VirtualBox 添加img时报错 \"VT-x is not available\"
解决方法
open a command prompt as administrator and run the following command:
dism.exe /Online /Disable-Feature:Microsoft-Hyper-V
配置:
选择网络: 打开网络配置选项,选择Attached to: Bridged Adapter,并在Name里选择你对应的网卡,这样它会给你分配与当前主机一样的外网IP
查看ip: ip addr | grep 10.
访问工具
Bitwise SSH Client,可以访问sfpt和ssh
安装docker和docker compose
详见 http://codingsoho.com/zh/blog/docker/
安装Postman
https://www.getpostman.com/
运行Edgex
下载docker compose 文件
手册里指定下载文件为: https://github.com/edgexfoundry/developer-scripts/raw/master/compose-files/docker-compose-edinburgh-1.0.0.yml
但是这个路径已不存在,下载下面的来代替: https://github.com/edgexfoundry/developer-scripts/blob/master/releases/edinburgh/compose-files/docker-compose-edinburgh-1.0.1.yml
下载容器container
Once you have downloaded the docker-compose.yml file, run the following command to download the containers for each of the EdgeX Foundry microservices.
启动Edgex
docker-compose up -d volume
docker-compose up -d consul
docker-compose up -d config-seed
docker-compose up -d mongo
docker-compose up -d logging
docker-compose up -d notifications
docker-compose up -d metadata
docker-compose up -d data
docker-compose up -d command
docker-compose up -d scheduler
docker-compose up -d export-client
docker-compose up -d export-distro
docker-compose up -d rulesengine
iot@flyway:~$ docker-compose ps
            Name Command State Ports
-------------------------------------------------------------------------------------------------------------------------------------------------
edgex-config-seed /bin/sh -c /edgex/cmd/conf ... Exit 0
edgex-core-command /core-command --consul --p ... Up 0.0.0.0:48082->48082/tcp
edgex-core-consul docker-entrypoint.sh agent ... Up 8300/tcp, 8301/tcp, 8301/udp, 8302/tcp, 8302/udp,
                                                                           0.0.0.0:8400->8400/tcp, 0.0.0.0:8500->8500/tcp,
                                                                           0.0.0.0:8600->8600/tcp, 8600/udp
edgex-core-data /core-data --consul --prof ... Up 0.0.0.0:48080->48080/tcp, 0.0.0.0:5563->5563/tcp
edgex-core-metadata /core-metadata --consul -- ... Up 0.0.0.0:48081->48081/tcp, 48082/tcp
edgex-device-random /device-random --registry ... Exit 255 0.0.0.0:49988->49988/tcp
edgex-device-virtual /bin/sh -c java -jar -Djav ... Exit 255 0.0.0.0:49990->49990/tcp
edgex-export-client /export-client --consul -- ... Up 0.0.0.0:48071->48071/tcp
edgex-export-distro /export-distro --consul -- ... Up 0.0.0.0:48070->48070/tcp, 0.0.0.0:5566->5566/tcp
edgex-files /bin/sh -c /usr/bin/tail - ... Up
edgex-mongo docker-entrypoint.sh /bin/ ... Up 0.0.0.0:27017->27017/tcp
edgex-support-logging /support-logging --consul ... Up 0.0.0.0:48061->48061/tcp
edgex-support-notifications /support-notifications --c ... Up 0.0.0.0:48060->48060/tcp
edgex-support-rulesengine /bin/sh -c java -jar -Djav ... Up 0.0.0.0:48075->48075/tcp
edgex-support-scheduler /support-scheduler --consu ... Up 0.0.0.0:48085->48085/tcp
iot_portainer_1_61ccf44183fe /portainer -H unix:///var/ ... Exit 1
用例
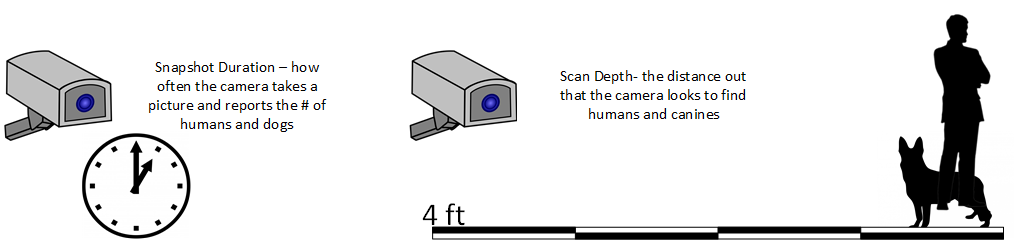
假定你想把一台新设备连接到EdgeX,该设备是一个摄像头,它执行拍照并通过内置芯片分析图片,并报告它看到的人和狗的数量。

摄像头拍照和报告的频率是可配置的。你可以发送请求去设置拍照间隔(秒),然后可以计算产生的照片里的人和狗的数量。你也可以设置扫描深度(单位:feet), 这是用来设置拍照的距离的。拍照越远,精确度越差,所以,这也是生产商希望的用户根据自己的需求去设置。
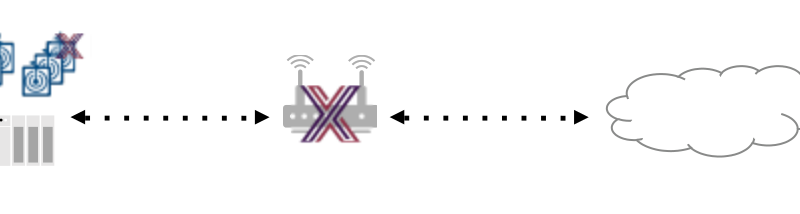
在EdgeX里,我们用设备Device来代表摄像头,每一个设备都通过一个设备服务Device Service微服务来管理。设备服务根据设备选择的协议与底层硬件进行通信。设备服务从设备收集数据,并发送给EdgeX (进入核心数据 core data).
在这个例子中,设备服务将会收集摄像头看到的人和狗的数量,设备服务同样会将EdgeX和外部的请求转换为物理设备能够理解的协议请求。所以,在这个例子中,设备服务将会接收设置拍照间隔和扫描深度的请求,然后将他们转换为摄像头能够处理的协议命令。

至于摄像头物理上怎么连到运行EdgeX的主机上,以及设备服务如何与设备进行通信的,不是本文的重点。
定义数据
当一个设备服务第一次在EdgeX上启动时,它有很多事情要去做,概括为以下几点:
- 为设备和设备服务确立参考信息
- 使设备服务对EdgeX可知
- 为设备提供设备服务,它将和EdgeX一起来管理它
Reference information includes things such as defining the address (called an Addressable) of the Device and Device Service or establishing the new unit of measure (called a Value Descriptor in EdgeX) used by the Device. The term “provision” is the way we talk about establishing the initial connection to the physical Device and have it be known to and communication with EdgeX.
After the first run of a Device Service, these steps are not repeated. For example, after its initial startup, a Device Service would not need to re-establish the reference information into EdgeX. Instead,it would simply check that these operations have been accomplished and do not need to be redone.
创建参考信息 Reference Information
There is a lot of background information that EdgeX needs to know about the Device and Device Service before it can start collecting data from the Device or send actuation commands to the Device. Say, for example, the camera Device wanted to report its human and canine counts. If it were to just start sending numbers into EdgeX, EdgeX would have no idea of what those numbers represented or even where they came from. Further, if someone/something wanted to send a command to the camera, it would not know how to reach the camera without some additional information like where the camera is located on the network. This background or reference information is what a Device Service must define in EdgeX when it first comes up. The API calls here give you a glimpse of this communication between the fledgling Device Service and the other EdgeX micro services. By the way, the order in which these calls are shown may not be the exact order that a Device Service does them. As you become more familiar with Device Services and the Device Service SDK, the small nuances and differences will become clear.
Addressables
See Core Metadata API RAML at APIs Core Services Metadata The Device Service will often establish at least two Addressable objects with the Core Metadata micro service. An Addressable is a flexible EdgeX object that specifies a physical address of something - in this case the physical address of the Device Service and the Device (the camera). While an Addressable could be created for a named MQTT pipe or other protocol endpoint, for this example, we will assume that both the Device Service and Device are able to be reached via HTTP REST calls. So in this case, the Device Service would make two calls to Core Metadata, to create the Addressable for the Device Service:
- Device Service
POST to http://localhost:48081/api/v1/addressable
BODY: {"name":"camera control","protocol":"HTTP","address":"172.17.0.1","port":49977,"path":"/cameracontrol","publisher":"none","user":"none","password":"none","topic":"none"}
名字: "camera control"
查看 addressable信息
http://localhost:48081/api/v1/addressable/name/camera1 address
http://localhost:48081/api/v1/addressable/name/camera control
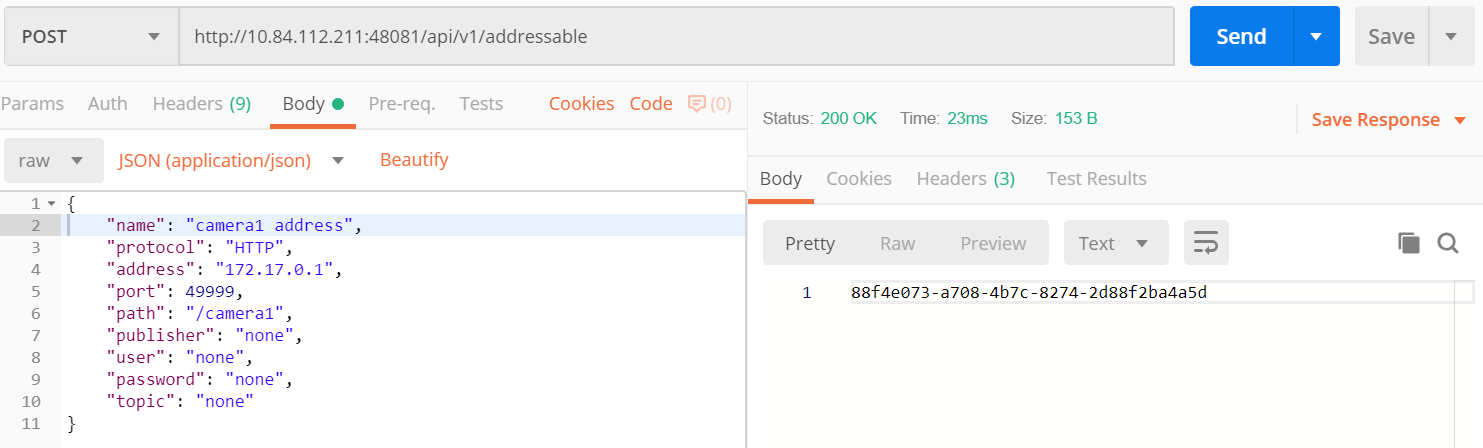
- Device (摄像头)
and the Addressable for the Device (the camera in this case):
POST to http://localhost:48081/api/v1/addressable
BODY: {"name":"camera1 address","protocol":"HTTP","address":"172.17.0.1","port":49999,"path":"/camera1","publisher":"none","user":"none","password":"none","topic":"none"}
Note that for an Addressable, a unique name must be provided. Obviously, these address are phony and made up for the purposes of this exercise. This is OK and it will still allow you to see how your Device and Device Services will work going forward.
名字: "camera address"
If your API call was successful, you will get a generated ID for your new Addressable that looks like this:
5b773ad19f8fc200012a802d
如果用Postman,localhost需要改成IP 10.84.112.217
http://10.84.112.211:48081/api/v1/addressable
如果用curl命令行
curl -H "Content-Type:application/json" -X POST --data '{"name":"camera control","protocol":"HTTP","address":"172.17.0.1","port":49977,"path":"/cameracontrol","publisher":"none","user":"none","password":"none","topic":"none"}' http://localhost:48081/api/v1/addressable
curl -H "Content-Type:application/json" -X POST --data '{"name":"camera1 address","protocol":"HTTP","address":"172.17.0.1","port":49999,"path":"/camera1","publisher":"none","user":"none","password":"none","topic":"none"}' http://localhost:48081/api/v1/addressable
Value Descriptors
See Core Data API RAML at APIs Core Services Core Data
Next, the Device Service needs to inform EdgeX about the type of data it will be sending on the behalf of the Devices. If you are given the number 5, what does that mean to you? Nothing, without some context and unit of measure. For example, if I was to say 5 feet is the scan depth of the camera right now, you have a much better understanding about what the number 5 represents. In EdgeX, Value Descriptors provide the context and unit of measure for any data (or values) sent to and from a Device. As the name implies, a Value Descriptor describes a value - its unit of measure, its min and max values (if there are any), the way to display the value when showing it on the screen, and more. Any data obtained from a Device (we call this “get” from the Device) or any data sent to the Device for actuation (we call this “set” or “put” to the Device) requires a Value Descriptor to be associated with that data.
In this demo, there are four Value Descriptors required: human count, canine count, scan depth, and snapshot duration. The Device Service would make four POST requests to Core Data to establish these Value Descriptors.
Pay attention to the port numbers. In the previous section you were calling the core-metadata service (port 48081), in these you will be calling core-data (port 48080)
POST to http://localhost:48080/api/v1/valuedescriptor
BODY: {"name":"humancount","description":"people count", "min":"0","max":"100","type":"I","uomLabel":"count","defaultValue":"0","formatting":"%s","labels":["count","humans"]}
BODY: {"name":"caninecount","description":"dog count", "min":"0","max":"100","type":"I","uomLabel":"count","defaultValue":"0","formatting":"%s","labels":["count","canines"]}
BODY: {"name":"depth","description":"scan distance", "min":"1","max":"10","type":"I","uomLabel":"feet","defaultValue":"1","formatting":"%s","labels":["scan","distance"]}
BODY: {"name":"duration","description":"time between events", "min":"10","max":"180","type":"I","uomLabel":"seconds","defaultValue":"10","formatting":"%s","labels":["duration","time"]}
An error can occur when communication with the camera. Therefore a fifth Value Descriptor is created for this eventuality.
BODY: {"name":"cameraerror","description":"error response message from a camera", "min":"","max":"","type":"S","uomLabel":"","defaultValue":"error","formatting":"%s","labels":["error","message"]}
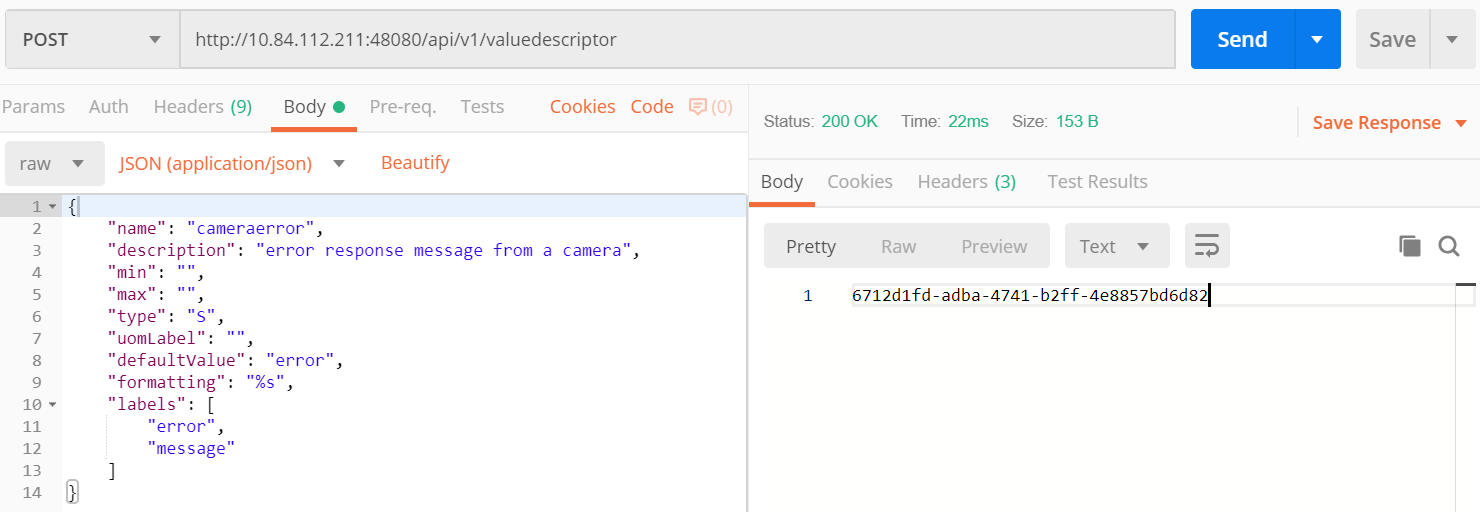
Again, the name of each Value Descriptor must be unique (within all of EdgeX). The type of a Value Descriptor indicates the type of the associated value: I (integer), F (floating point number), S (character or string), B (boolean), or J (JSON object). Formatting is used by UIs and should follow the printf formatting standard for how to represent the associated value.
If you make a GET call to the http://localhost:48080/api/v1/valuedescriptor URL you will get a listing (in JSON) of all the Value Descriptors currently defined in your instance of EdgeX, including the ones you just added.
定义设备
A Device Profile can be thought of as a template or as a type or classification of Device. General characteristics about the type of Device, the data theses Devices provide, and how to command them is all provided in a Device Profile. Other pages within these docs provide more details about a Device Profile and its purpose (see Metadata to start). It is typical that as part of the reference information setup sequence, the Device Service provides the Device Profiles for the types of Devices it manages.
添加设备Device
See Core Metadata API RAML at APIs Core Services Metadata Our fictitious Device Service will manage only the human/dog counting camera, so it only needs to make one POST request to create the monitoring camera Device Profile. Since Device Profiles are often represented in YAML, make a muti-part form-data POST with the Device Profile file below to create the Camera Monitor profile.
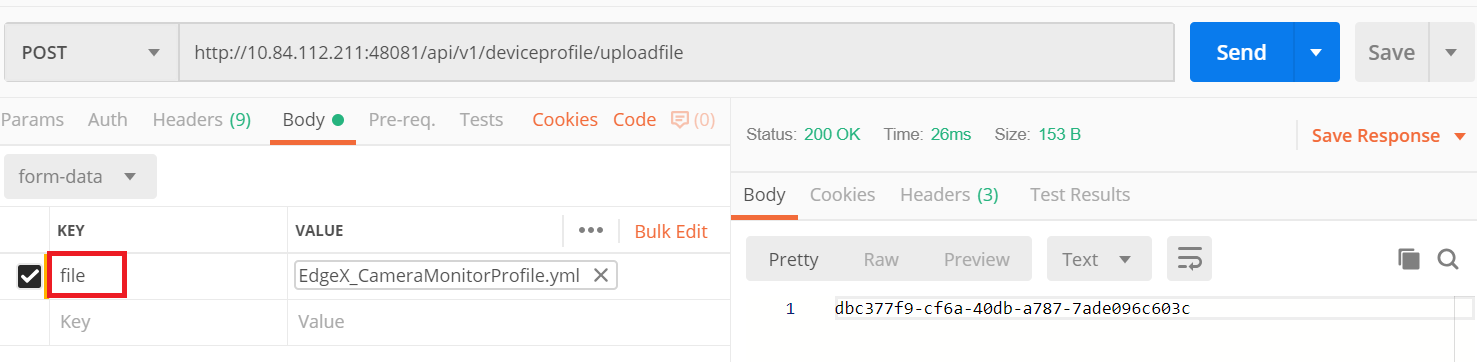
POST to http://localhost:48081/api/v1/deviceprofile/uploadfile
In this step you will want to use the form-data POST format in Postman, with a key named “file” of type “File”. Download and use the provided EdgeX_CameraMonitorProfile.yml for this.
注意:选择form-data,手写file;并将文件放到C:\Users\bin_he4\Postman\files。否则会有报警"the file resides outside the working directory, collaborators may not have the same file path"
使用postman POST文件
FORM-DATA:
key: “file”
value: EdgeX_CameraMonitorProfile.yml
注意,在选择"File"文件后,一定要手写file,否则会报错YAML文件为空。
查看 device profile
http://localhost:48081/api/v1/deviceprofile/name/camera monitor profile
注意: compose profile版本一致的问题,coreCommands改为commands,否则commands读不出来。>> 后面证实时compose file文件不匹配导致的这个问题
Each profile has a unique name along with a description, manufacturer, model and collection of labels to assist in queries for particular profiles. These are relatively straightforward attributes of a profile.
理解命令
The Device Profile defines how to communicate with any Device that abides by the profile. In particular, it defines the Commands that can be sent to the Device (via the Device Service). Commands are named and have either a get (for retrieving data from the Device) or put (to send data to the Device) or both. Each Command can have a single get and single put. Both get and put are optional, but it would not make sense to have a Command without at least one get or at least one put. The Command name must be unique for that profile (the Command name does not have to be unique across all of EdgeX - for example, many profiles may contain a “status” Command).
理解GETS和PUTS命令
The get and put each have a path which is used by EdgeX to call on the specific Command get or put at the URL address provided for the service. Hypothetically, if the address to a Device Service was “http://abc:9999” and the get Command had a path of “foo”, then internally, EdgeX would know to use “http://abc:9999/foo” to call on the get Command. Get and puts then have response objects (an array of response objects). A get must have at least one response object. A put is not required to have a response. Responses might be “good” or “error” responses. Each get should have at least one “good” response, but it may have several error responses depending on what problems or issues the Device Service may need to reply with. Each response is made up of a code (which suggests if it is a good or error response), a description (human readable information about what is in the response), and an array of expected values. For practical purposes, the code is usually an HTTP status code like 200 (for good responses), 404 or 503 (examples of bad responses). The expected values in a response are an array of Value Descriptor names. If a call to an get Command is expected to return back the human and dog count data, then the response’s expected values would be: [humancount, caninecount]. When the actual call to the Device Service is made, the body of the return response from the service is expected to return a value for each of the expected values in a map where the Value Descriptor names are used as keys. Again, using the human and dog counts as an example, if the expected values were [humancount, caninecount] then the body of a good response from the service would contain a map that looks something like this:
{
  humancount: 5,
  caninecount: 2
}
Here is an example set of responses that might be used for a get Command in the camera example. Note that one response is coded as the “good” response (code 200) while the other is for “error” response (code 404). The expected values for the good response are the Value Descriptor names for the camera’s count data. The expected values for the “error” response is the Value Descriptor name for an error message.
"responses":[
            {"code":"200","description":"ok","expectedValues":["humancount", "caninecount"]},
            {"code":"404","description":"bad request","expectedValues":["cameraerror"]}
           ]
       }
理解命令参数
Commands are used to send data to Devices (via Device Services) as much as they are used to get data from Devices. Therefore, any Command may have a set of parameters associated with its call. Parameter data is added to the body of the Command request. Parameters are defined via an array of parameterNames on a Command.
Here again, this array is just an array of Value Descriptor names. Each Value Descriptor defines the name and type of information to be supplied as a parameter to the Command call. For example, if a Command had a parameterNames array of [depth, duration], then the receiving command is expecting values that match the depth and duration Value Descriptors.
Similar to the way expected values are used to set the keys of the response body, the paremater names are used as keys in a map to pass parameter values in a Command call that has parameters. Here might be what is populated in the body of the Command call when the parameterNames are [depth, duration].
{
  depth: 1,
  duration: 10
}
If you open the CameraMonitorProfile.yml file, see that there are Commands to get people and dog counts (and a command called Counts, which provides both values). There are also commands to get/put the snapshot duration and scan depth. Also note the expected values for the Commands. The expected values should match the name of the Value Descriptors from above that give context to the returned values. In real implementations, the Device Profile may contain many more details (like device resource and resource elements) to assist the Device Service in its communications with Devices.
- Metadata does not currently check that the expected values match an existing Value Descriptor by name. Therefore, make sure you provide the expected values array carefully when creating Device Profiles.
注册设备服务 Device Service
Once the reference information is established by the Device Service in Core Data and Meta Data, the Device Service can register or define itself in EdgeX. That is, it can proclaim to EdgeX that “I have arrived and am functional.”
Register with Core Configuration and Registration
See APIs Core Services Configuration and Registry
Part of that registration process of the Device Service, indeed any EdgeX micro service, is to register itself with the Core Configuration & Registration. In this process, the micro service provides its location to the Config/Reg micro service and picks up any new/latest configuration information from this central service. Since there is no real Device Service in this demonstration, this part of the inter-micro service exchange is not explored here.
创建设备服务 Device Service
See APIs Core Services Metadata The Device Service must then create an instance of itself in Core Metadata. It is in this registration, that the Device Service is associated to the Addressable for the Device Service that is already Core Metadata. Make this POST to Core Metadata to create the Device Service (using the Addressable’s unique name to establish the association)
POST to http://localhost:48081/api/v1/deviceservice
BODY: {"name":"camera control device service","description":"Manage human and dog counting cameras","labels":["camera","counter"],"adminState":"unlocked","operatingState":"enabled","addressable":
{"name":"camera control"}}
名字: "camera control device service",addressable: "camera control"
The name of the Device Service must be unique across all of EdgeX. Note the admin and operating states. The administrative state (aka admin state) provides control of the Device Service by man or other systems. It can be set to locked or unlocked. When a Device Service is set to locked, it is not suppose to respond to any Command requests nor send data from the Devices. The operating state (aka op state) provides an indication on the part of EdgeX about the internal operating status of the Device Service. The operating state is not set externally (as by another system or man), it is a signal from within EdgeX (and potentially the Device Service itself) about the condition of the service. The operating state of the Device Service may be either enabled or disabled. When the operating state of the Device Service is disabled, it is either experiencing some difficulty or going through some process (for example an upgrade) which does not allow it to function in its normal capacity.
如何去删除一个设备服务?
https://edgex.discourse.group/t/how-to-delete-a-device-profile/65
The steps could be:
- find devices (GET to localhost:48082/api/v1/device)
- delete a target device (DELETE to localhost:48081/api/v1/device/id/DEVICE-ID)
- find device profiles (GET to localhost:48081/api/v1/deviceprofile)
- delete a target device profile (DELETE to localhost:48081/api/v1/deviceprofile/id/DEVICE-PROFILE-ID)
- the http prefix are removed since discourse doesn’t allow multiple URLs. Can't delete device profile, the profile is still in use by a device
- http://localhost:48081/api/v1/deviceservice 查看 device service: http://10.84.112.217:48081/api/v1/deviceservice/name/camera control device service
Provision a Device
In the last act of setup, a Device Service often discovers and provisions new Devices it finds and is going to manage on the part of EdgeX. Note the word “often” in the last sentence. Not all Device Services will discover new Devices or provision them right away. Depending on the type of Device and how the Devices communicate, it is up to the Device Service to determine how/when to provision a Device. In some rare cases, the provisioning may be triggered by a human request of the Device Service once everything is in place and once the human can provide the information the Device Service needs to physically connect to the Device.
添加设备
See APIs Core Services Metadata For the sake of this demonstration, the call to Core Metadata below will provision the human/dog counting monitor camera as if the Device Service discovered it (by some unknown means) and provisioned the Device as part of some startup process. To create a Device, it must be associated to a Device Profile (by name or id), a Device Service (by name or id), and contain one or more Protocols defining its address. When calling each of the POST calls above, the ID was returned by the associated micro service and used in the call below. In this example, the names of Device Profile, Device Service, and Protocols are used.
POST to http://localhost:48081/api/v1/device
BODY: {"name":"countcamera1","description":"human and dog counting camera #1","adminState":"unlocked","operatingState":"enabled","protocols":{"camera protocol":{"camera address":"camera 1"}},"labels": ["camera","counter"],"location":"","service":{"name":"camera control device service"},"profile":{"name":"camera monitor profile"}}
名字:"countcamera1",对应服务:"camera control device service",profile为"camera monitor profile"
Note that camera monitor profile was created by the CameraMonitorProfile.yml you uploaded in a previous step.
问题:mgoGetAddressableById Invalid Object ID : A device must be associated to an Addressable
https://github.com/edgexfoundry/device-sdk-go/issues/308
@MandipJ The docker-compose you are using is 0.7.1 (delhi), so you have to use the delhi branch of device-sdk-go.
Edinburgh hasn't been released, and our target date is 6/20
docker compose 文件匹配的问题,选用https://github.com/edgexfoundry/developer-scripts/blob/master/releases/edinburgh/compose-files/docker-compose-edinburgh-1.0.1.yml 可解决问题
测试安装和设置
With the Device Service and Device now appropriately setup/provisioned in EdgeX, let’s try a few of the micro service APIs out to confirm that things have been configured correctly.
检查设备服务 Device Service
See APIs Core Services Metadata To begin, check out that the Device Service is available via Core Metadata.
GET to http://localhost:48081/api/v1/deviceservice
    {
        "created": 1565076640886,
        "modified": 1565076640886,
        "origin": 0,
        "description": "Manage human and dog counting cameras",
        "id": "5d492ca09f8fc200012bedd9",
        "name": "camera control device service", #
        "lastConnected": 0,
        "lastReported": 0,
        "operatingState": "ENABLED",
        "labels": [
            "camera",
            "counter"
        ],
        "addressable": { #
            "created": 1565074899967,
            "modified": 0,
            "origin": 0,
            "id": "5d4925d39f8fc200012bedd7", #
            "name": "camera control", # addressable
            "protocol": "HTTP",
            "method": null,
            "address": "172.17.0.1",
            "port": 49977,
            "path": "/cameracontrol",
            "publisher": "none",
            "user": "none",
            "password": "none",
            "topic": "none",
            "baseURL": "HTTP://172.17.0.1:49977",
            "url": "HTTP://172.17.0.1:49977/cameracontrol"
        },
        "adminState": "UNLOCKED"
    },
Note that the associated Addressable is returned with the Device Service. There are many additional APIs on Core Metadata to retrieve a Device Service. As an example, here is one to find all Device Services by label - in this case using the label that was associated to the camera control device service.
GET to http://localhost:48081/api/v1/deviceservice/label/camera
检查服务
See APIs Core Services Metadata Ensure the monitor camera is among the devices known to Core Metadata.
GET to http://localhost:48081/api/v1/device
Note that the associated Device Profile, Device Service and Addressable is returned with the Device. Again, there are many additional APIs on Core Metadata to retrieve a Device. As an example, here is one to find all Devices associated to a given Device Profile - in this case using the camera monitor profile Device Profile name.
GET to http://localhost:48081/api/v1/device/profilename/camera+monitor+profile
[
    {
        "created": 1565082727095,
        "modified": 1565082727095,
        "origin": 0,
        "description": "human and dog counting camera #1",
        "id": "5d4944679f8fc200012beddc", #
        "name": "countcamera1",
        "adminState": "UNLOCKED",
        "operatingState": "ENABLED",
        "addressable": { # addressable
            "created": 1565074935879,
            "modified": 0,
            "origin": 0,
            "id": "5d4925f79f8fc200012bedd8", #
            "name": "camera1 address", #
            "protocol": "HTTP",
            "method": null,
            "address": "172.17.0.1",
            "port": 49999,
            "path": "/camera1",
            "publisher": "none",
            "user": "none",
            "password": "none",
            "topic": "none",
            "baseURL": "HTTP://172.17.0.1:49999",
            "url": "HTTP://172.17.0.1:49999/camera1"
        },
        "lastConnected": 0,
        "lastReported": 0,
        "labels": [
            "camera",
            "counter"
        ],
        "location": "",
        "service": { # service
            "created": 1565076640886,
            "modified": 1565076640886,
            "origin": 0,
            "description": "Manage human and dog counting cameras",
            "id": "5d492ca09f8fc200012bedd9", #
            "name": "camera control device service", #
            "lastConnected": 0,
            "lastReported": 0,
            "operatingState": "ENABLED",
            "labels": [
                "camera",
                "counter"
            ],
            "addressable": { #
                "created": 1565074899967,
                "modified": 0,
                "origin": 0,
                "id": "5d4925d39f8fc200012bedd7", #
                "name": "camera control", #
                "protocol": "HTTP",
                "method": null,
                "address": "172.17.0.1",
                "port": 49977,
                "path": "/cameracontrol",
                "publisher": "none",
                "user": "none",
                "password": "none",
                "topic": "none",
                "baseURL": "HTTP://172.17.0.1:49977",
                "url": "HTTP://172.17.0.1:49977/cameracontrol"
            },
            "adminState": "UNLOCKED"
        },
        "profile": { #
            "created": 1565079868632,
            "modified": 1565079868632,
            "origin": 0,
            "description": "Human and canine camera monitor profile",
            "id": "5d49393c9f8fc200012bedda", #
            "name": "camera monitor profile",
            "manufacturer": "Dell",
            "model": "Cam12345",
            "labels": [
                "camera"
            ],
            "objects": null,
            "deviceResources": null,
            "resources": null,
            "commands": null #
        }
    }
]
调用命令
Recall that the Device Profile (the camera monitor profile) included a number of Commands to get and put information from any Device of that type. Also recall that the Device (the countcamera1) was associated to the Device Profile (the camera monitor profile) when the Device was provisioned.
列出命令
See APIs Core Services Command Now with all the setup complete, you can ask the Core Command micro service for the list of Commands associated to the Device (the countcamera1).
GET to http://localhost:48082/api/v1/device/name/countcamera1
Note all of the URLs returned as part of this response! These are the URLs that clients (internal or external to EdgeX) can call to trigger the various get and put offerings on the Device.
查看 Value Descriptors
See APIs Core Services Core Data See that the Value Descriptors are in Core Data. There should be a total of 5 Value Descriptors in Core Data. Note that Value Descriptors are stored in Core Data, yet referenced in Metadata. This is because as data coming from a Device is sent to Core Data, Core Data may need to validate the incoming values against the associated Value Descriptor parameters (like min, max, etc.) but without having to make a trip to Core Metadata to do that validation. Getting data into Core Data is a key function of EdgeX and must be accomplished as quickly as possible (without having to make additional REST requests).
GET to http://localhost:48080/api/v1/valuedescriptor
While we’re at it, check that no data has yet been shipped to Core Data. Since the Device Service and Device are in this demonstration wholly manually driven by you, no sensor data should yet have been collected. You can test this theory by asking for the count of Events in Core Data.
GET to http://localhost:48080/api/v1/event/count
执行命令
While there is no real Device or Device Service in this walk through, EdgeX doesn’t know that. Therefore, with all the configuration and setup you have performed, you can ask EdgeX to set the scan depth or set the snapshot duration to the camera, and EdgeX will dutifully try to perform the task. Of course, since no Device Service or Device exists, as expected EdgeX will ultimately responds with an error. However, through the log files, you can see a Command made of the Core Command micro service, attempts to call on the appropriate Command of the fictitious Device Service that manages our fictitious camera. For example sake, let’s launch a Command to set the scan depth of countcamera1 (the name of the single human/dog counting camera Device in EdgeX right now). The first task to launch a request to set the scan depth is to get the URL for the Command to “PUT” or set a new scan depth on the Device. As seen above request a list of the Commands by the Device name with the following API on Core Command
GET to http://localhost:48082/api/v1/device/name/countcamera1
Now locate and copy the URL for the PUT Depth Command. Because of the IDs used, this will be different on each system so a generic API call will not suffice here. Below is a picture containing a slice of the JSON returned by the GET request above and desired PUT Command URL highlighted - yours will vary based on IDs. Copy this URL into your REST client tool of choice and make a PUT to that URL on Core Command with the new depth as the parameter with that request.
PUT to http://localhost:48082/api/v1/device/<system specific device id>/command/<system specific command id>
BODY: {"depth":"9"}
Again, because no Device Service (or Device) actually exists, Core Command will respond with an HTTP 502 Bad Gateway error. However, checking the logging output will prove that the Core Command micro service did receive the request and attempted to call on the non-existent Device Service to issue the actuating command.
docker logs edgex-core-command
INFO: 2019/02/15 19:32:13 Issuing GET command to: http://172.17.0.1:49977/api/v1/devices/5c6711419f8fc200010f4ada/scandepth
ERROR: 2019/02/15 19:32:13 Get http://172.17.0.1:49977/api/v1/devices/5c6711419f8fc200010f4ada/scandepth: dial tcp 172.17.0.1:49977: getsockopt: connection refused
Sending events and reading data
In the real world, the human/dog counting camera would start to take pictures, count beings, and send that data to EdgeX. To simulate this activity. in this section, you will make Core Data API calls as if you were the camera’s Device and Device Service.
Send an Event/Reading
See APIs Core Services Core Data Data is submitted to Core Data as an Event. An Event is a collection of sensor readings from a Device (associated to a Device by its ID or name) at a particular point in time. A Reading in an Event is a particular value sensed by the Device and associated to a Value Descriptor (by name) to provide context to the reading. So, the human/dog counting camera might determine that there are current 5 people and 3 dogs in the space it is monitoring. In the EdgeX vernacular, the Device Service upon receiving these sensed values from the Device would create an Event with two Readings - one Reading would contain the key/value pair of humancount:5 and the other Reading would contain the key/value pair of caninecount:3. The Device Service, on creating the Event and associated Reading objects would transmit this information to Core Data via REST call.
POST to http://localhost:48080/api/v1/event
BODY: {"device":"countcamera1","readings":[{"name":"humancount","value":"5"},{"name":"caninecount","value":"3"}]}
BODY: {"device":"countcamera1","origin":1471806386919, "readings":[{"name":"humancount","value":"1","origin":1471806386919},{"name":"caninecount","value":"0","origin":1471806386919}]}
If desired, the Device Service can also supply an origin property (see below) to the Event or Reading to suggest the time (in Epoch timestamp/milliseconds format) at which the data was sensed/collected. If an origin is not provided, no origin will be set for the Event or Reading, however every Event and Reading is provided a Created and Modified timestamp in the database to give the data some time context.
BODY: {"device":"countcamera1","origin":1471806386919, "readings":[{"name":"humancount","value":"1","origin":1471806386919},{"name":"caninecount","value":"0","origin":1471806386919}]}
Note: Smart devices will often timestamp sensor data and this timestamp can be used as the origin timestamp. In cases where the sensor/device is unable to provide a timestamp (“dumb” or brownfield sensors), it is recommended that the Device Service create a timestamp for the sensor data that is applied as the origin timestamp for the Device.
Reading data
Now that an Event (or two) and associated Readings have been sent to Core Data, you can use the Core Data API to explore that data that is now stored in MongoDB. Recall from the Test Setup section, you checked that no data was yet stored in Core Data. Make the same call and this time, 2 Event records should be the count returned.
GET to http://localhost:48080/api/v1/event/count
2
Retrieve 10 of the Events associated to the countcamera1 Device.
GET to http://localhost:48080/api/v1/event/device/countcamera1/10
[
    {
        "id": "87da4db4-b17b-4c36-bcb8-e1cc7b6da0e7",
        "device": "countcamera1",
        "created": 1565862183380,
        "modified": 1565862183380,
        "origin": 1471806386919,
        "readings": [
            {
                "id": "af486351-a140-41f6-8ee6-a5f0166711b0",
                "created": 1565862183360,
                "origin": 1471806386919,
                "modified": 1565862183360,
                "device": "countcamera1",
                "name": "humancount",
                "value": "1"
            },
            {
                "id": "bf029467-a6bc-496a-bfe5-8fcf42b2e943",
                "created": 1565862183360,
                "origin": 1471806386919,
                "modified": 1565862183360,
                "device": "countcamera1",
                "name": "caninecount",
                "value": "0"
            }
        ]
    },
    {
        "id": "9513598c-ee0a-409a-8dcb-50ce1a8d1fe3",
        "device": "countcamera1",
        "created": 1565862164849,
        "modified": 1565862164849,
        "readings": [
            {
                "id": "62d0a791-b3a1-4d0b-9abf-ed32187e5686",
                "created": 1565862164807,
                "modified": 1565862164807,
                "device": "countcamera1",
                "name": "humancount",
                "value": "5"
            },
            {
                "id": "a1728470-9013-45cc-a2bf-855b75bbce56",
                "created": 1565862164807,
                "modified": 1565862164807,
                "device": "countcamera1",
                "name": "caninecount",
                "value": "3"
            }
        ]
    }
]
Retrieve 10 of the human count Readings associated to the countcamera1 Device (i.e. - get Readings by Value Descriptor)
GET to http://localhost:48080/api/v1/reading/name/humancount/10
[
    {
        "id": "af486351-a140-41f6-8ee6-a5f0166711b0",
        "created": 1565862183360,
        "origin": 1471806386919,
        "modified": 1565862183360,
        "device": "countcamera1",
        "name": "humancount",
        "value": "1"
    },
    {
        "id": "62d0a791-b3a1-4d0b-9abf-ed32187e5686",
        "created": 1565862164807,
        "modified": 1565862164807,
        "device": "countcamera1",
        "name": "humancount",
        "value": "5"
    }
]
Exporting your device data
Great, so the data sent by the camera Device makes it way to Core Data. How can that data be sent to an enterprise system or the Cloud? How can that data be used by an edge analytics system (like the Rules Engine provided with EdgeX) to actuate on a Device? Anything wishing to receive the sensor/device data as it comes into EdgeX must register as an “export” client.
Export Clients
In fact, by default, the Rules Engine is automatically registered as a client of the export services and automatically receives all the Events/Readings from Core Data that are sent by Devices. To see all the existing export clients, you can request a list from the Export Client micro service.
GET to http://localhost:48071/api/v1/registration
[
    {
        "id": "49afb695-784b-4693-87ed-eecc8988fd05",
        "created": 1565857506660,
        "modified": 1565857506660,
        "origin": 0,
        "name": "EdgeXRulesEngine",
        "addressable": {
            "id": "09a34253-e30f-4fcb-bba8-799c399deb20",
            "name": "EdgeXRulesEngineAddressable",
            "protocol": "ZMQ",
            "method": "POST"
        },
        "format": "SERIALIZED",
        "filter": {},
        "encryption": {},
        "enable": true,
        "destination": "ZMQ_TOPIC"
    }
]
The response from Export Client is a list of registered client details - in this case just the Rules Engine is registered.
Register an Export Client
To register a new client to receive EdgeX data, you will first need to setup a client capable of receiving HTTP REST calls, or an MQTT topic capable of receiving messages from EdgeX. For the purposes of this demonstration, let’s say there is an cloud based MQTT Topic that has been setup ready to receive EdgeX Event/Reading data. To register this MQTT endpoint to receive all Event/Reading data, in JSON format, but encrypted, you will need to request Export Client to make a new EdgeX client.
POST to http://localhost:48071/api/v1/registration
BODY: {"name":"MyMQTTTopic","addressable":{"name":"MyMQTTBroker","protocol":"TCP","address":"tcp://m10.cloudmqtt.com","port":15421,"publisher":"EdgeXExportPublisher","user":"hukfgtoh","password":"mypass","topic":"EdgeXDataTopic"},"format":"JSON","encryption":{"encryptionAlgorithm":"AES","encryptionKey":"123","initializingVector":"123"},"enable":true,"destination":"MQTT_TOPIC"}
Note that the Addressable for the REST address is built into the request. Now, should a new Event be posted to Core Data, the Export Distro micro service will attempt to sent the encrypted, JSON-formated Event/Reading data to the MQTT client. Unless you have actually setup the MQTT Topic to receive the messages, Export Distro will fail to deliver the contents and an error will result. You can check the Export Distro log to see the attempt was made and that the EdgeX Export services are working correctly, despite the non-existence of the receiving MQTT Topic. MQTTOutboundServiceActivator: message sent to MQTT broker:
{
    "name": "MyMQTTTopic",
    "addressable": {
        "name": "MyMQTTBroker",
        "protocol": "TCP",
        "address": "tcp://m10.cloudmqtt.com",
        "port": 15421,
        "publisher": "EdgeXExportPublisher",
        "user": "hukfgtoh",
        "password": "mypass",
        "topic": "EdgeXDataTopic"
    },
    "format": "JSON",
    "encryption": {
        "encryptionAlgorithm": "AES",
        "encryptionKey": "123",
        "initializingVector": "123"
    },
    "enable": true,
    "destination": "MQTT_TOPIC"
}
参考文档
- https://docs.edgexfoundry.org/Ch-Walkthrough.html
Reference Information 参考信息
Device 设备
Device Service 设备服务
Device Profile 设备文件