原文:https://fuji-docs.edgexfoundry.org/Ch-ExamplesAddingMQTTDevice.html
EdgeX - Edinburgh Release
1.概述
下面例子中,我们用模拟器来代替真实设备,这样可以直接的来测试MQTT特性
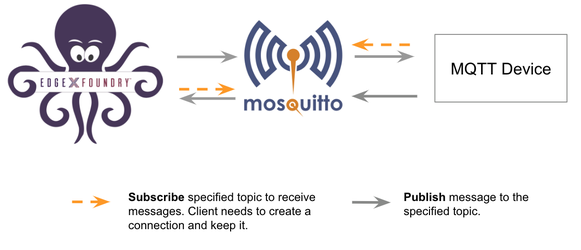
运行MQTT Broker
Eclipse Mosquitto是一个开源(EPL/EDL licensed) 的message Broker,它支持MQTT协议5.0, 3.1.1以及3.1
使用下面docker命令运行Mosquitto
docker run -d --rm --name broker -p 1883:1883 eclipse-mosquitto
2.运行MQTT设备模拟器
模拟器完成下面三件事情:
- 每15秒发布随机数据
- 接收读取reading请求,并返回响应
- 接收Put请求,然后修改设备值
我们创建下面的脚本来模拟MQTT服务
// mock-device.js
function getRandomFloat(min, max) {
    return Math.random() * (max - min) + min;
}
const deviceName = "MQ_DEVICE";
let message = "test-message";
// 1. Publish random number every 15 seconds
schedule('*/15 * * * * *', ()=>{
    let body = {
        "name": deviceName,
               "cmd": "randnum",
        "randnum": getRandomFloat(25,29).toFixed(1)
    };
    publish( 'DataTopic', JSON.stringify(body));
});
// 2. Receive the reading request, then return the response
// 3. Receive the put request, then change the device value
subscribe( "CommandTopic" , (topic, val) => {
    var data = val;
        if (data.method == "set") {
        message = data[data.cmd]
    }else{
        switch(data.cmd) {
            case "ping":
              data.ping = "pong";
              break;
            case "message":
              data.message = message;
              break;
            case "randnum":
                data.randnum = 12.123;
                break;
          }
    }
    publish( "ResponseTopic", JSON.stringify(data));
});
要运行设备模拟器,输入下面命令并根据你的实际情况做出修改
mv mock-device.js /path/to/mqtt-scripts

docker run -d --restart=always --name=mqtt-scripts \
  -v /path/to/mqtt-scripts:/scripts \
  dersimn/mqtt-scripts --url mqtt://mqtt-broker-ip --dir /scripts
- 将
/path/to/mqtt-scripts修改为你的正确路径 - 将
mqtt-broker-ip修改为你的正确的broker ip
设置 setup
创建文件夹,在里面放入部署需要的文件
- device-service-demo
  |- docker-compose.yml
  |- mqtt
     |- configuration.toml
     |- mqtt.test.device.profile.yml
设备文件 Device Profile (mqtt.test.device.profile.yml)
设备文件定义了设备的取值和操作方法,可以通过它们来进行读写操作
创建设备文件mqtt.test.device.profile.yml,并添加以下内容
# mqtt.test.device.profile.yml
name: "Test.Device.MQTT.Profile"
manufacturer: "iot"
model: "MQTT-DEVICE"
description: "Test device profile"
labels:
  - "mqtt"
  - "test"
deviceResources:
  -
    name: randnum
    description: "device random number"
    properties:
      value:
        { type: "Float64", size: "4", readWrite: "R", floatEncoding: "eNotation" }
      units:
        { type: "String", readWrite: "R", defaultValue: "" }
  -
    name: ping
    description: "device awake"
    properties:
      value:
        { type: "String", size: "0", readWrite: "R", defaultValue: "pong" }
      units:
        { type: "String", readWrite: "R", defaultValue: "" }
  -
    name: message
    description: "device message"
    properties:
      value:
        { type: "String", size: "0", readWrite: "W" ,scale: "", offset: "", base: "" }
      units:
        { type: "String", readWrite: "R", defaultValue: "" }
deviceCommands:
  -
    name: testrandnum
    get:
    - { index: "1", operation: "get", object: "randnum", parameter: "randnum" }
  -
    name: testping
    get:
    - { index: "1", operation: "get", object: "ping", parameter: "ping" }
  -
    name: testmessage
    get:
    - { index: "1", operation: "get", object: "message", parameter: "message" }
    set:
    - { index: "1", operation: "set", object: "message", parameter: "message" }
coreCommands:
  -
    name: testrandnum
    get:
      path: "/api/v1/device/{deviceId}/testrandnum"
      responses:
      -
        code: "200"
        description: "get the random value"
        expectedValues: ["randnum"]
      -
        code: "503"
        description: "service unavailable"
        expectedValues: []
  -
    name: testping
    get:
      path: "/api/v1/device/{deviceId}/testping"
      responses:
      -
        code: "200"
        description: "ping the device"
        expectedValues: ["ping"]
      -
        code: "503"
        description: "service unavailable"
        expectedValues: []
  -
    name: testmessage
    get:
      path: "/api/v1/device/{deviceId}/testmessage"
      responses:
      -
        code: "200"
        description: "get the message"
        expectedValues: ["message"]
      -
        code: "503"
        description: "service unavailable"
        expectedValues: []
    put:
      path: "/api/v1/device/{deviceId}/testmessage"
      parameterNames: ["message"]
      responses:
      -
        code: "204"
        description: "set the message."
        expectedValues: []
      -
        code: "503"
        description: "service unavailable"
        expectedValues: []
5.设备服务配置(configuration.toml)
使用配置文件去定义设备和调度任务。device-mqtt在启动时生成一个相关的实例。
MQTT是订阅/发布模式,所以我们必须在配置文件的 [DeviceList.Protocols]部分定义MQTT连接信息。
创建配置文件,取名configuration.toml,内容如下,修改Host ip为你的主机IP
# configuration.toml
[Writable]
LogLevel = 'DEBUG'
[Service]
Host = "edgex-device-mqtt"
Port = 49982
ConnectRetries = 3
Labels = []
OpenMsg = "device mqtt started"
Timeout = 5000
EnableAsyncReadings = true
AsyncBufferSize = 16
[Registry]
Host = "edgex-core-consul"
Port = 8500
CheckInterval = "10s"
FailLimit = 3
FailWaitTime = 10
Type = "consul"
[Logging]
EnableRemote = false
File = "./device-mqtt.log"
[Clients]
[Clients.Data]
Name = "edgex-core-data"
Protocol = "http"
Host = "edgex-core-data"
Port = 48080
Timeout = 50000
[Clients.Metadata]
Name = "edgex-core-metadata"
Protocol = "http"
Host = "edgex-core-metadata"
Port = 48081
Timeout = 50000
[Clients.Logging]
Name = "edgex-support-logging"
Protocol = "http"
Host ="edgex-support-logging"
Port = 48061
[Device]
DataTransform = true
InitCmd = ""
InitCmdArgs = ""
MaxCmdOps = 128
MaxCmdValueLen = 256
RemoveCmd = ""
RemoveCmdArgs = ""
ProfilesDir = "/custom-config"
# Pre-define Devices
[[DeviceList]]
Name = "MQ_DEVICE"
Profile = "Test.Device.MQTT.Profile"
Description = "General MQTT device"
Labels = [ "MQTT"]
[DeviceList.Protocols]
[DeviceList.Protocols.mqtt]
Schema = "tcp"
Host = "192.168.16.68"
Port = "1883"
ClientId = "CommandPublisher"
User = ""
Password = ""
Topic = "CommandTopic"
[[DeviceList.AutoEvents]]
Frequency = "30s"
OnChange = false
Resource = "testrandnum"
# Driver configs
[Driver]
IncomingSchema = "tcp"
IncomingHost = "192.168.16.68"
IncomingPort = "1883"
IncomingUser = ""
IncomingPassword = ""
IncomingQos = "0"
IncomingKeepAlive = "3600"
IncomingClientId = "IncomingDataSubscriber"
IncomingTopic = "DataTopic"
ResponseSchema = "tcp"
ResponseHost = "192.168.16.68"
ResponsePort = "1883"
ResponseUser = ""
ResponsePassword = ""
ResponseQos = "0"
ResponseKeepAlive = "3600"
ResponseClientId = "CommandResponseSubscriber"
ResponseTopic = "ResponseTopic"
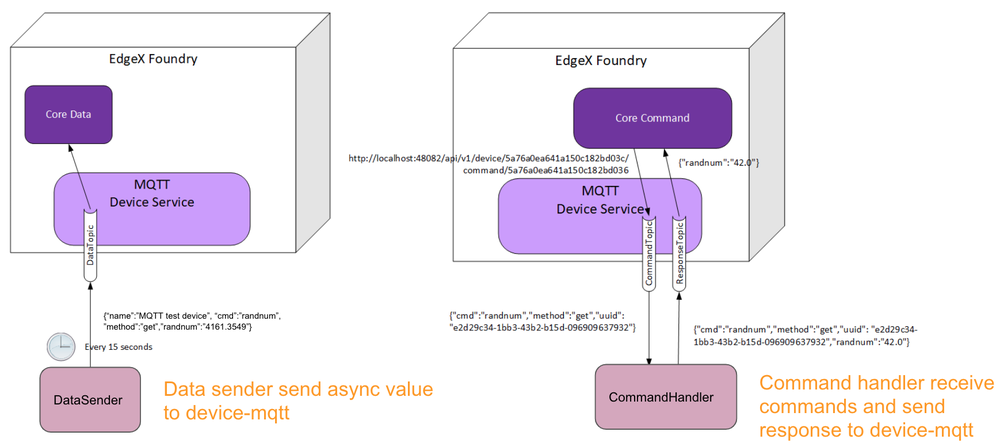
In the Driver configs section:
- IncomingXxx定义了从设备接收的异步值的数据主题DataTopic
- ResponseXxx定义了从设备接收的命令响应的响应主题ResponseTopic
6.把设备服务添加到docker-compose文件(docker-compose.yml)
下载docker-compose文件 https://github.com/edgexfoundry/developer-scripts/blob/master/compose-files/docker-compose-edinburgh-1.0.0.yml
由于我们使用docker-compose部署EdgeX,我们必须将device-mqtt添加到docker-compose。If you have prepared configuration files, you can mount them using volumes and change the entrypoint for device-mqtt internal use.
下面是docker-compose的代码片段
device-mqtt:
  image: edgexfoundry/docker-device-mqtt-go:1.0.0
  ports:
    - "49982:49982"
  container_name: edgex-device-mqtt
  hostname: edgex-device-mqtt
  networks:
    - edgex-network
  volumes:
    - db-data:/data/db
    - log-data:/edgex/logs
    - consul-config:/consul/config
    - consul-data:/consul/data
    - ./mqtt:/custom-config
  depends_on:
    - data
    - command
  entrypoint:
    - /device-mqtt
    - --registry=consul://edgex-core-consul:8500
    - --confdir=/custom-config
当使用设备服务时,用户需要在–registry参数提供registry URL
在Docker上启动EdgeX Foundry
下面的文件夹放好之后,我们就可以开始部署EdgeX了
- device-service-demo
  |- docker-compose.yml
  |- mqtt
     |- configuration.toml
     |- mqtt.test.device.profile.yml
使用下面命令进行EdgeX部署
cd path/to/device-service-demo
docker-compose pull
docker-compose up -d
服务启动之后,查看控制台面板

执行命令
接下来就可以执行相关命令了
7.查找可执行命令
使用下面命令去查询可执行命令
$ curl http://your-edgex-server-ip:48082/api/v1/device | json_pp
  % Total % Received % Xferd Average Speed Time Time Time Current
                                 Dload Upload Total Spent Left Speed
100 1972 100 1972 0 0 64349 0 --:--:-- --:--:-- --:--:-- 65733
[
   {
      "location" : null,
      "adminState" : "UNLOCKED",
      "commands" : [
         {
            ...
         },
         {
            ...
         },
         {
            "get" : {
               "responses" : [
                  {
                     "code" : "503",
                     "description" : "service unavailable"
                  }
               ],
               "path" : "/api/v1/device/{deviceId}/testmessage",
               "url" : "http://edgex-core-command:48082/api/v1/device/ddb2f5cf-eec2-4345-86ee-f0d87e6f77ff/command/0c257a37-2f72-4d23-b2b1-2c08e895060a"
            },
            "modified" : 1559195042046,
            "name" : "testmessage",
            "put" : {
               "parameterNames" : [
                  "message"
               ],
               "path" : "/api/v1/device/{deviceId}/testmessage",
               "url" : "http://edgex-core-command:48082/api/v1/device/ddb2f5cf-eec2-4345-86ee-f0d87e6f77ff/command/0c257a37-2f72-4d23-b2b1-2c08e895060a"
            },
            "created" : 1559195042046,
            "id" : "0c257a37-2f72-4d23-b2b1-2c08e895060a"
         }
      ],
      "lastReported" : 0,
      "operatingState" : "ENABLED",
      "name" : "MQ_DEVICE",
      "lastConnected" : 0,
      "id" : "ddb2f5cf-eec2-4345-86ee-f0d87e6f77ff",
      "labels" : [
         "MQTT"
      ]
   }
]
8.执行Put命令
根据url和参数名来执行Put命令,当运行edgex-core-command时,将[host]替换为服务器IP,可以有下面两种方法来执行
$ curl http://your-edgex-server-ip:48082/api/v1/device/ddb2f5cf-eec2-4345-86ee-f0d87e6f77ff/command/0c257a37-2f72-4d23-b2b1-2c08e895060a \
    -H "Content-Type:application/json" -X PUT \
    -d '{"message":"Hello!"}'
或者
$ curl “http://your-edgex-server-ip:48082/api/v1/device/name/MQ_DEVICE/command/testmessage”
-H “Content-Type:application/json” -X PUT -d ‘{“message”:”Hello!”}’
9.执行Get命令
执行Get命令,如下
$ curl "http://your-edgex-server-ip:48082/api/v1/device/name/MQ_DEVICE/command/testmessage" | json_pp
  % Total % Received % Xferd Average Speed Time Time Time Current
                                 Dload Upload Total Spent Left Speed
100 139 100 139 0 0 132 0 0:00:01 0:00:01 --:--:-- 132
{
   "readings" : [
      {
         "name" : "message",
         "device" : "MQ_DEVICE",
         "value" : "Hello!",
         "origin" : 1559196276732
      }
   ],
   "device" : "MQ_DEVICE",
   "origin" : 1559196276738
}
10.调度任务 Schedule Job
调度任务定义在TOML配置文件的[[DeviceList.AutoEvents]]部分
# Pre-define Devices
[[DeviceList]]
  Name = "MQ_DEVICE"
  Profile = "Test.Device.MQTT.Profile"
  Description = "General MQTT device"
  Labels = [ "MQTT"]
  [DeviceList.Protocols]
    [DeviceList.Protocols.mqtt]
       Schema = "tcp"
       Host = "192.168.16.68"
       Port = "1883"
       ClientId = "CommandPublisher"
       User = ""
       Password = ""
       Topic = "CommandTopic"
  [[DeviceList.AutoEvents]]
    Frequency = "30s"
    OnChange = false
    Resource = "testrandnum"
服务启动之后,查询core-data的读API。结果显示,服务每30s自动执行一次该命令,显示如下
$ curl http://your-edgex-server-ip:48080/api/v1/reading | json_pp
  % Total % Received % Xferd Average Speed Time Time Time Current
                                 Dload Upload Total Spent Left Speed
100 1613 100 1613 0 0 372k 0 --:--:-- --:--:-- --:--:-- 393k
[
   {
      "value" : "1.212300e+01",
      "origin" : 1559197206092,
      "modified" : 1559197206104,
      "id" : "59f2a768-ad72-49a1-9df9-700d8599a890",
      "created" : 1559197206104,
      "device" : "MQ_DEVICE",
      "name" : "randnum"
   },
   {
      ...
   },
   {
      "name" : "randnum",
      "device" : "MQ_DEVICE",
      "modified" : 1559197175109,
      "created" : 1559197175109,
      "id" : "f9dc39e0-5326-45d0-831d-fd0cd106fe2f",
      "origin" : 1559197175098,
      "value" : "1.212300e+01"
   },
]
异步数据读取
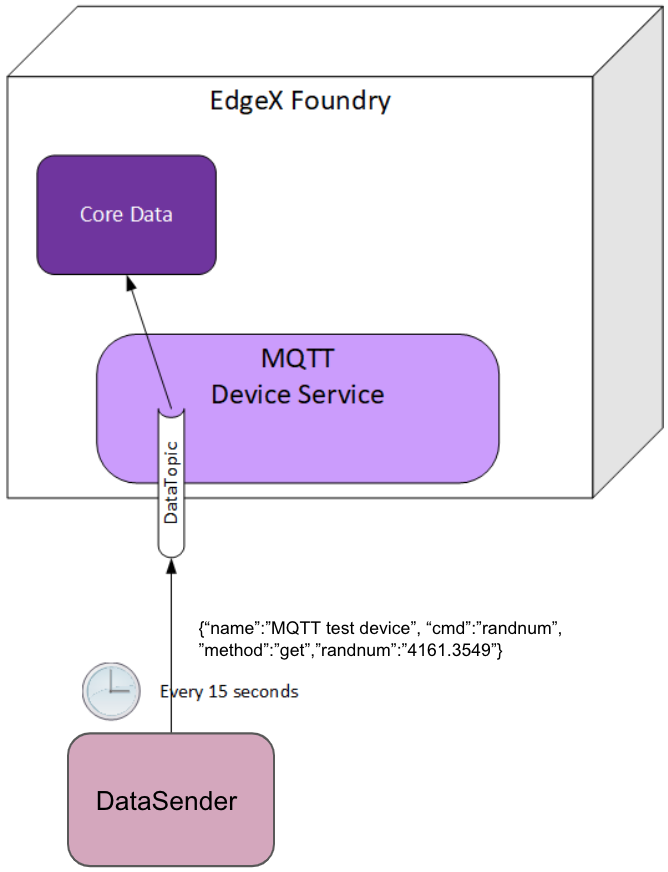
device-mqtt订购一个DataTopic, 它等待真实设备发送数据给broker,接下来device-mqtt解析这个值,并把它发回给core-data
数据格式包含下面值
- name = device name
- cmd = deviceResource name
- method = get or put
- cmd = device reading
你必须在设备配置文件里定义连接信息,如下:
[Driver]
IncomingSchema = "tcp"
IncomingHost = "192.168.16.68"
IncomingPort = "1883"
IncomingUser = ""
IncomingPassword = ""
IncomingQos = "0"
IncomingKeepAlive = "3600"
IncomingClientId = "IncomingDataSubscriber"
IncomingTopic = "DataTopic"
下面的结果显示,模拟设备每15毫秒发送一次读取reading
$ curl http://your-edgex-server-ip:48080/api/v1/reading | json_pp
  % Total % Received % Xferd Average Speed Time Time Time Current
                                 Dload Upload Total Spent Left Speed
100 539 100 539 0 0 169k 0 --:--:-- --:--:-- --:--:-- 175k
[
   {
      ...
   },
   {
      "name" : "randnum",
      "created" : 1559197140013,
      "origin" : 1559197140006,
      "modified" : 1559197140013,
      "id" : "286cc305-42f6-4bca-ad41-3af52301c9f7",
      "value" : "2.830000e+01",
      "device" : "MQ_DEVICE"
   },
   {
      "modified" : 1559197125011,
      "name" : "randnum",
      "created" : 1559197125011,
      "origin" : 1559197125004,
      "device" : "MQ_DEVICE",
      "value" : "2.690000e+01",
      "id" : "c243e8c6-a904-4102-baff-8a5e4829c4f6"
   }
]