

前言
本文主要讨论如何利用markdown在django CMS中插入代码。
本文环境:
Python 2.7.10
Django 1.10
DjangCMS 3.5
CMS代码插件
通过CMS plugin里的code插入代码
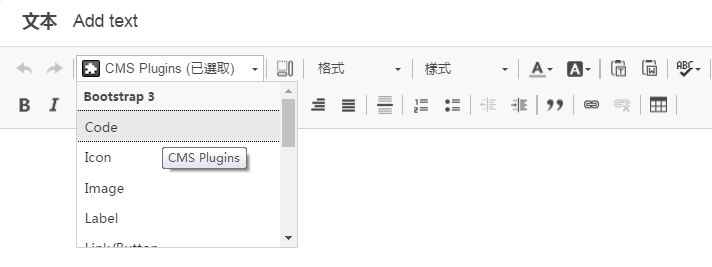
Code插入有五种方式
Inline
User Input
Basic block
Variables
Sample output
具体含义可参考 https://getbootstrap.com/docs/4.1/content/code/
这个不是本文重点,不做具体描述
DjangoCMS markdown插件
具体研究过两个插件djangocms-markdown和cmsplugin-markdown
库 djangocms-markdown
github主页:https://github.com/ovidner/djangocms-markdown
它的依赖库有django-markdown-duex和markdown2
Successfully installed django-markdown-deux-1.0.5 djangocms-markdown-0.3.2 markdown2-2.3.5
下面简单进行一下代码的走读,看看它是怎么工作的
首先,它把markdown功能做成了template tag,这样直接在模板文件里应用就可以了,格式为{{text|markdown:”recipe”}},recipe是指定参数,默认为default,具体意义后面解释。
djangocms_markdown\templates\djangocms_markdown\markdown.html
{% load markdown_deux_tags %}
{{ text|markdown:"recipe" }}
在markdown_deux库里实现了这个tag
markdown_deux\templatetags\markdown_deux_tags.py
@register.filter(name="markdown")
def markdown_filter(value, style="default"):
    """Processes the given value as Markdown, optionally using a particular
    Markdown style/config

    Syntax::

        {{ value|markdown }} {# uses the "default" style #}
        {{ value|markdown:"mystyle" }}

    Markdown "styles" are defined by the `MARKDOWN_DEUX_STYLES` setting.
    """
    try:
        return mark_safe(markdown_deux.markdown(value, style))
    except ImportError:
        if settings.DEBUG:
            raise template.TemplateSyntaxError("Error in `markdown` filter: "
                "The python-markdown2 library isn't installed.")
        return force_text(value)
markdown_filter.is_safe = True
上面这个filter并没有做什么特别的处理,也就是调用了markdown2的markdown功能,把style参数传递进去了。下一章节我们会走读markdown2的代码,并结合style参数的配置来理解和使用。
注意:style的配置在setting完成,参数名为settings.MARKDOWN_DEUX_STYLES
文件markdown_deux.__init__.py封装了markdown及获取style的函数
def markdown(text, style="default"):
    if not text:
        return ""
    import markdown2
    return markdown2.markdown(text, **get_style(style))

def get_style(style):
    from markdown_deux.conf import settings
    try:
        return settings.MARKDOWN_DEUX_STYLES[style]
    except KeyError:
        return settings.MARKDOWN_DEUX_STYLES.get("default",
            settings.MARKDOWN_DEUX_DEFAULT_STYLE)
markdown_deux\conf\settings.py
from django.conf import settings

MARKDOWN_DEUX_HELP_URL = getattr(settings, "MARKDOWN_DEUX_HELP_URL",
    "http://daringfireball.net/projects/markdown/syntax")

MARKDOWN_DEUX_DEFAULT_STYLE = {
    "extras": {
        "code-friendly": None,
    },
    "safe_mode": "escape",
}

MARKDOWN_DEUX_STYLES = getattr(settings, "MARKDOWN_DEUX_STYLES",
    {"default": MARKDOWN_DEUX_DEFAULT_STYLE})

DEBUG = settings.DEBUG
库 cmsplugin-markdown
依赖库有Markdown和django-markwhat,从使用看跟djangocms-markdown 没太大差别,因为没有仔细研究代码,所以不展开讨论。
Github主页:https://github.com/bitlabstudio/cmsplugin-markdown
pip install Django
pip install django-cms
pip install Markdown
pip install django-markwhat
cmsplugin-simple-markdown
https://github.com/Alir3z4/cmsplugin-simple-markdown
Successfully installed cmsplugin-simple-markdown-1.6 django-markdown-0.8.4
这个库没有具体去研究
djangocms_markdown之markdown2详解
前面走读了djangocms-markdown的代码,主要功能的实现时通过markdown2来实现的。没有看到专门介绍代码方式的文档,从代码阅读的结果看,主要包括code span,code block和fence code block三种情况
Python interactive shell也包含在内。
Github主页:https://github.com/trentm/python-markdown2
它的匹配主要通过正则表达式来完成,所以中间会穿插一点介绍。
场景 code span
用法: ` ` ` code ` ` `
生成代码: <code>code</code>
效果:
<p class="cms-plugin cms-plugin-277">
    <code>code</code>
</p>
它的代码调用栈如下
def markdown
    def convert(self, text):
        def _run_block_gamut(self, text):
            def _form_paragraphs(self, text):
                def _run_span_gamut(self, text):
                    def _do_code_spans(self, text):
                        def _code_span_sub(self, match):
                            c = match.group(2).strip(" \t")
                            c = self._encode_code(c)
                            return "<code>%s</code>" % c
正则表达式的定义如下
    _code_span_re = re.compile(r'''
            (?<!\\)
            (`+) # \1 = Opening run of `
            (?!`) # See Note A test/tm-cases/escapes.text
            (.+?) # \2 = The code block
            (?<!`)
            \1 # Matching closer
            (?!`)
        ''', re.X | re.S)
re.X(VERBOSE) 该标志通过给予更灵活的格式以便将正则表达式写得更易于理解
re.S(DOTALL) 使.匹配包括换行在内的所有字符
从下面函数的注释看,它对`符号的个数并没有严格的限制。
    def _do_code_spans(self, text):
        # * Backtick quotes are used for <code></code> spans.
        #
        # * You can use multiple backticks as the delimiters if you want to
        # include literal backticks in the code span. So, this input:
        #
        # Just type ``foo `bar` baz`` at the prompt.
        #
        # Will translate to:
        #
        # <p>Just type <code>foo `bar` baz</code> at the prompt.</p>
        #
        # There's no arbitrary limit to the number of backticks you
        # can use as delimters. If you need three consecutive backticks
        # in your code, use four for delimiters, etc.
        #
        # * You can use spaces to get literal backticks at the edges:
        #
        # ... type `` `bar` `` ...
        #
        # Turns to:
        #
        # ... type <code>`bar`</code> ...
        return self._code_span_re.sub(self._code_span_sub, text)
场景 code block
用法: 注意代码块前面空行,代码块前面有四个空格或tab
```
代码块
```
生成代码:
<pre><code>代码块</code></pre>
效果演示:
代码如下
def a():
    a = a+1
生成的html代码
<pre class="prettyprint cms-plugin cms-plugin-277">
    <code>def a():
        a = a+1
    </code>
</pre>
特别说明一下,在bootstrap4里面好像<pre>效果取消了,所以这个是我自己添加的,具体看我后面附件节。
可以看到,这儿的代码并没有语法高亮效果,要达到这种效果,我们需要第三方插件。
在settings里,可以看到有个配置参数html-classes,从注释中可以看到,它可以通过google-code-prettify来着色。
        "extras": {
            # `class` attribute put on `pre` tags to enable using
            # <http://code.google.com/p/google-code-prettify/> for syntax
            # highlighting.
            "html-classes": {"pre": "prettyprint"},
        },
用法比较简单,引入下面三个css和js
    <link href="https://cdn.bootcss.com/prettify/r298/prettify.min.css" rel='stylesheet' type='text/css'>
    <script src="https://cdn.bootcss.com/prettify/r298/prettify.min.js"></script>
要让代码运行起来可以有两种方法,一种是引入run_prettify.js,另外一种是在body里加入一段代码调用prettyPrint函数。
<script src="https://cdn.bootcss.com/prettify/r298/run_prettify.min.js"></script>
    <script type="text/javascript">
      window.onload = function(){
        prettyPrint();
      };
    </script>
使用过程中发现这种方式能工作,但是网页刷新后要过段时间效果才出来,怀疑是不是跟这个是google的服务有关。
下面看看代码里是怎么实现的。
代码块匹配正则表达式函数如下
    def _do_code_blocks(self, text):
        """Process Markdown `<pre><code>` blocks."""
        code_block_re = re.compile(r'''
            (?:\n\n|\A\n?)
            ( # $1 = the code block -- one or more lines, starting with a space/tab
              (?:
                (?:[ ]{%d} | \t) # Lines must start with a tab or a tab-width of spaces
                .*\n+
              )+
            )
            ((?=^[ ]{0,%d}\S)|\Z) # Lookahead for non-space at line-start, or end of doc
            # Lookahead to make sure this block isn't already in a code block.
            # Needed when syntax highlighting is being used.
            (?![^<]*\</code\>)
            ''' % (self.tab_width, self.tab_width),
            re.M | re.X)
        return code_block_re.sub(self._code_block_sub, text)
re的用法参考http://www.codingsoho.com/zh/blog/python-re/
接下来我们来解释上面的代码:
(?:\n\n|\A\n?) 表示以空行开始
(?:[ ]{%d} | \t) 每行行开始时,四个空格 或者 tab
((?: (?:[ ]{%d} | \t) .*\n+ )+ ) 每行以四个空格或tab开始然后后面跟任意字符.*并以换行结束\n+,这些匹配可重复((re)+)
((?=^[ ]{0,%d}\S)|\Z) 匹配结束,用到了后向界定
(?![^<]*\</code\>) 后向非界定,确保这段代码并没有用语法高亮
场景 fence code block
要达到代码块的显示效果,我们还可以通过fence code block
简单的列一下调用关系便于代码查找
    def convert(self, text):
        if "fenced-code-blocks" in self.extras and not self.safe_mode:
            text = self._do_fenced_code_blocks(text)

    def _do_fenced_code_blocks(self, text):
        """Process ```-fenced unindented code blocks ('fenced-code-blocks' extra)."""
        return self._fenced_code_block_re.sub(self._fenced_code_block_sub, text)
    def _fenced_code_block_sub(self, match):
        return self._code_block_sub(match, is_fenced_code_block=True)
    _fenced_code_block_re = re.compile(r'''
        (?:\n+|\A\n?)
        ^```\s*?([\w+-]+)?\s*?\n # opening fence, $1 = optional lang
        (.*?) # $2 = code block content
        ^```[ \t]*\n # closing fence
        ''', re.M | re.X | re.S)
上面的正则表达式实现了```code block```的匹配,不再详述。
下面仔细研究一下它的语法高亮怎么做的。
_code_block_sub 调用 _color_with_pygments,pygments是第三方工具,平时我也常用它来做代码语法高亮操作,生成的内容可以贴到word文档里。要实现该功能,首先要安装pygments。
pip install pygments
该函数用到了HtmlCodeFormatter类,这个处理代码格式。
    def _color_with_pygments(self, codeblock, lexer, **formatter_opts):
        import pygments
        import pygments.formatters
        class HtmlCodeFormatter(pygments.formatters.HtmlFormatter):
            def _wrap_code(self, inner):
                """A function for use in a Pygments Formatter which
                wraps in <code> tags.
                """
                yield 0, "<code>"
                for tup in inner:
                    yield tup
                yield 0, "</code>"

            def wrap(self, source, outfile):
                """Return the source with a code, pre, and div."""
                return self._wrap_div(self._wrap_pre(self._wrap_code(source)))

        formatter_opts.setdefault("cssclass", "codehilite")
        formatter = HtmlCodeFormatter(**formatter_opts)
        return pygments.highlight(codeblock, lexer, formatter)
class HtmlFormatter(Formatter):
    def __init__(self, **options):
        Formatter.__init__(self, **options)
        self.title = self._decodeifneeded(self.title)
        self.nowrap = get_bool_opt(options, 'nowrap', False)
        self.noclasses = get_bool_opt(options, 'noclasses', False)
        self.classprefix = options.get('classprefix', '')
        self.cssclass = self._decodeifneeded(options.get('cssclass', 'highlight'))
        self.cssstyles = self._decodeifneeded(options.get('cssstyles', ''))
        self.prestyles = self._decodeifneeded(options.get('prestyles', ''))
        self.cssfile = self._decodeifneeded(options.get('cssfile', ''))
        self.noclobber_cssfile = get_bool_opt(options, 'noclobber_cssfile', False)
        self.tagsfile = self._decodeifneeded(options.get('tagsfile', ''))
        self.tagurlformat = self._decodeifneeded(options.get('tagurlformat', ''))
        self.filename = self._decodeifneeded(options.get('filename', ''))
        ……
Formatter默认的cssclass是codehilite, 生成的html代码里它会给<pre>的wrapper div添加这个class。
HtmlFormatter完整格式定义如下
- http://pygments.org/docs/formatters/#HtmlFormatter
- http://pygments-doc.readthedocs.io/en/latest/formatters/html.html
关于fenced code blocks的设置如下
It includes support for code syntax highlighting as per GFM. You must have the pygments Python module installed for this to work.
To really show colors you need to add one of pygment css files, see https://github.com/richleland/pygments-css. Instead of directly using the css files, it's necessary to regenerate css files with the div class being codehilite. Simply change the .highlight into .codehilite in the Makefile and make cssfiles.
默认配置下,css文件里的class是highlight,可以从https://github.com/richleland/pygments-css中看到
.highlight .gd { color: #A00000 } /* Generic.Deleted */
但是前面刚刚提到,代码里默认是codehilite
我们可以在settings文件里修改这个配置
MARKDOWN_DEUX_STYLES = {
    "recipe": {
        "link_patterns": [
            # Transform "Recipe 123" in a link.
            (re.compile(r"recipe\s+#?(\d+)\b", re.I),
             r"http://code.activestate.com/recipes/\1/"),
        ],
        "extras": {
            "code-friendly": None,
            "pyshell": None,
            "demote-headers": 3,
            "link-patterns": None,
            # `class` attribute put on `pre` tags to enable using
            # <http://code.google.com/p/google-code-prettify/> for syntax
            # highlighting.
            "html-classes": {"pre": "prettyprint"},
            "cuddled-lists": None,
            "footnotes": None,
            "header-ids": None,
            "fenced-code-blocks" : {'cssclass': 'mycodehilite', "prestyles":"background-color: #d2dee8;"},
        },
        "safe_mode": "escape",
    }
}
上面代码中,我可以将cssclass的名字写成了mycodehilite,如果这样的话,同时我也需要将对应的css里的class也改成了mycodehilite
另外,针对fenced-code-blocks,不仅可以设置cssclass,同时还可以设置其他的参数,比如prestyles,它将会给<pre>代码块添加这个style
举例如下:
空 行
``` python
import a
import b
```
生成的代码格式如下
<div class="mycodehilite">
    <pre style="background-color: #d2dee8;">
        <span></span>
        <code>
            <span class="kn">import</span> <span class="nn">os</span>
            <span class="kn">from</span> <span class="nn">os</span> <span class="kn">import</span> <span class="n">get</span>
            <span class="k">def</span> <span class="nf">a</span><span class="p">():</span>
            <span class="k">print</span> <span class="s2">"oo"</span>
        </code>
    </pre>
</div>
效果图

查看fenced-code-blocks,https://github.com/trentm/python-markdown2/wiki/fenced-code-blocks
对应pygments-css 在,https://github.com/richleland/pygments-css
场景 Python interactive shell
例子:
输入代码如下
Here is a Python interactive shell session
>>> import sys
>>> sys.platform
'darwin'
生成代码如下
<pre class="prettyprint cms-plugin cms-plugin-277">
    <code>
        >>> import sys
        >>> sys.platform
        'darwin'
    </code>
</pre>
对应setting配置
MARKDOWN_DEUX_STYLES = {
    "recipe": {
        "extras": {
            "pyshell": None,
        },
        "safe_mode": "escape",
    }
}
效果图
Here is a Python interactive shell session

>>> import sys
>>> sys.platform
'darwin'
https://github.com/trentm/python-markdown2/wiki/pyshell
总结
安装pygments
pip install pygments
设置markdown style 在settings.py设置STYLE
MARKDOWN_DEUX_STYLES = {
    "recipe": {
        "link_patterns": [
            # Transform "Recipe 123" in a link.
            (re.compile(r"recipe\s+#?(\d+)\b", re.I),
             r"http://code.activestate.com/recipes/\1/"),
        ],
        "extras": {
            "code-friendly": None,
            "pyshell": None,
            "demote-headers": 3,
            "link-patterns": None,
            # `class` attribute put on `pre` tags to enable using
            # <http://code.google.com/p/google-code-prettify/> for syntax
            # highlighting.
            "html-classes": {"pre": "prettyprint"},
            "cuddled-lists": None,
            "footnotes": None,
            "header-ids": None,
            "fenced-code-blocks" : {'cssclass': 'mycodehilite', "prestyles":"background-color: #d2dee8;"},
        },
        "safe_mode": "escape",
    }
}
上面的fenced-code-blocks,我用了自定义名称'cssclass': 'mycodehilite'以示区分,你当然可以用默认的名字,对应pygments-css 在,https://github.com/richleland/pygments-css
- 调用处添加style参数
比如在template里,使用
{{text|markdown:”recipe”}},python code里同样添加这个recipe作为额外的参数。
附件
<pre>
插件本身是基于bootstrap3的,但是clean blog基于bootstrap4,所以有些地方不兼容
code 这个原来在bootstrap3显示效果如下
import os
import sys
bootstrap4已经去掉了这些特殊效果,所以我只能自己去添加
pre{
 margin:15px 0;
}

pre{
 background-color:#f8f8f8;
 border:1px solid #ccc;
 font-size:13px;
 line-height:19px;
 overflow:auto;
 padding:6px 10px;
 border-radius:3px;
}

pre>code{
 margin:0;
 padding:0;
 white-space:pre;
 border:none;
 background:transparent;
}

pre code{
 background-color:transparent;
 border:none;
}
参考文件为 djangocms_markdown\static\djangocms_markdown\themes\preview\github.css
https://www.prepbootstrap.com/converter https://getbootstrap.com/docs/4.1/content/code/
db路径
本文在对markdown2学习时用到了debug功能,我选用的eclipse。
因为路径跟正常工作环境不一样,所以我重新写了个manage.py文件,并把它配置到eclipse中
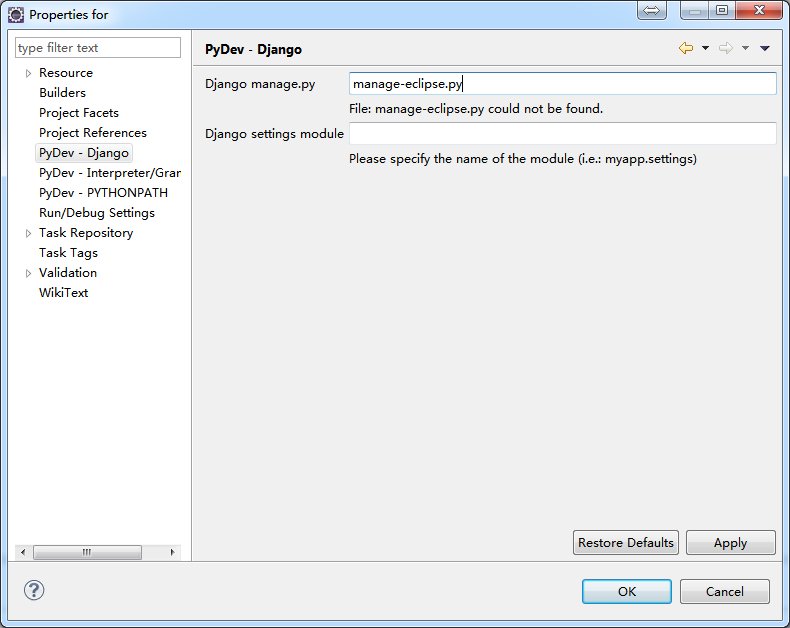
使用过程中发现一个问题,就是总是找不到db文件,后来查出来跟路径设置有关。
db必须用完整路径,否则eclipse会把它放到项目的workspace下面,导致运行时找不到(临时生成一个空的) windows命令行运行不会出现这个问题
DATABASES = {
    'default': {
        'CONN_MAX_AGE': 0,
        'ENGINE': 'django.db.backends.sqlite3',
        'HOST': 'localhost',
        'NAME': os.path.join(BASE_DIR, 'project1.db'),
        'PASSWORD': '',
        'PORT': '',
        'USER': ''
    }
}
文件管理
djangocms自带文件管理功能,这对markdown来说是很大的方便
- https://github.com/divio/django-filer/

评论
留言请先登录或注册! 并在激活账号后留言!